2 Ways to Quickly Find PC’s Specs on Windows 11
4K views · Nov 6, 2022 gearupwindows.com
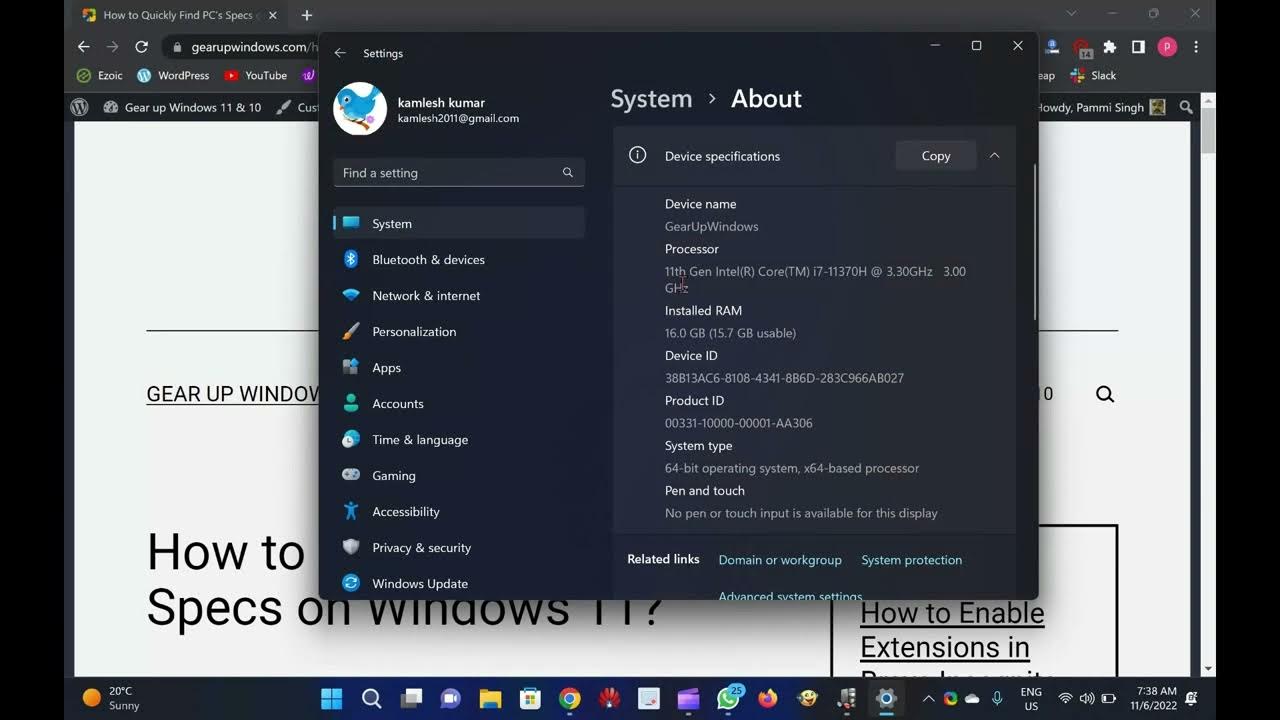
Here, you will learn How to Quickly Find PC’s Specs on Windows 11. Do you want to see the basic specs of your PC where Windows 11 is pre-installed? It is quite easy to see your PC’s specifications, such as how much RAM is installed, and what processor is using my computer. If your PC is running with Windows 11, you can quickly find the basic details from the Settings app. You don’t have to go through long steps to find the basic details you might prefer to see. How to See PC’s Specs on Windows 11 using Settings app? To quickly find out Windows 11 PC specifications, do the following:- Step 1. Press Windows + I keys simultaneously from the keyboard to open the Settings app on Windows 11. Alternatively, right-click on the Start button on the taskbar and select the Settings option. Step 2. Click on the System category from the left sidebar in the Windows Settings. Step 3. On the right-side pane of System, scroll down to the bottom and click on the About. Step 4. That’s it. Stop here. Under the Device specifications section, basic specs are available. If you wish to share with someone else, then click on the Copy button. Now, you can paste the copied details into a notepad or somewhere else that you wish. If you want to see what kind of CPU your Windows 11 PC uses, look for the “Processor” option. To find out how much memory (RAM) is in your PC, see next to the “Installed RAM” option. To see more details about your computer, you need to download a small tool, called Speccy. Using Speccy, you can quickly find the details of your PC in detail. How to View PC’s Specifications on Windows 11 through System Information? To see all the hardware specs of the computer, you can use System Information’s built-in application. Here is how to do it? Step 1. Press Windows + R keys to open the Run command box. Step 2. In the Run box, type msinfo32 and press Enter key from the keyboard to open the System Information app. Step 3. In the left sidebar of the System Information window, click on the System Summary. On the right side of it, you can view all your PC’s specifications, for instance, installed RAM, processor make & speed, system model, BIOS, and more. That's it. If you have not yet subscribed to @GearUpWindows channel, do hurry up. Download Speccy: https://www.ccleaner.com/speccy/download #windows #windows11 #windows10 #howto #tutorial #tutorials #settings

How to Find Out HDD or SSD Serial No using Seagate Drive Det...
6K views · Nov 5, 2022 gearupwindows.com
How to Find Out HDD or SSD Serial No using Seagate Drive Detect @GearUpWindows #windows #windows11 #windows10 #free #freeware #howto #tutorial #tutorials #segate
How to View Hard Disk Serial Number in Windows 11 or 10?
8K views · Nov 5, 2022 gearupwindows.com
For any reason, you are searching for a way to check or view the Serial Number of your hard disk or SSD on your computer or laptop, for instance, managing the inventory; this post will help you. If the hard disk or SSD is not fitted on your PC, you can easily see the sticker’s serial number. But what you will do if you have purchased a branded PC or notebook; it is impossible to unscrew your computer or laptop to find out the serial number on the sticker of the hard disk. By unscrewing the computer, you will lose the warranty. Without unscrewing the device, it is possible to find out the Serial Number of your PC. Download Seagate Drive Detect: http://support.seagate.com/kbimg/utils/drivedetect.exe Subscribe @GearUpWindows Chapters 00:00 Introduction 01:06 What is the serial number? 02:03 How to check the hard disk sticker label to find out the serial number? 02:56 How to find out the Hard Disk Drives (HDD) or Solid State Drives (SSD) serial number using Command Prompt on Windows 11/10? 04:30 How to Obtain the HDD (Hard Disk Drive) or SSD (Solid State Drives) serial number using PowerShell? 06:14 How to check out the Hard Disk Drives (HDD) or Solid State Drives (SSD) serial number using Third-Party Tool? #windows #windows11 #windows10 #howto #freeware #free #tutorial #tutorials #hdd #ssd #harddisk
How to Make Windows 11 Look and Feel Like Windows 10?
788 views · Nov 4, 2022 growupwindows.com
The same is true when you switch to Windows 11 from Windows 10. Many changes have been made to the UI. Microsoft refreshes the look and feels of every new version of an operating system to make it more interesting.
How to Show the Taskbar on all Monitors on Windows 11?
1K views · Nov 4, 2022 gearupwindows.com
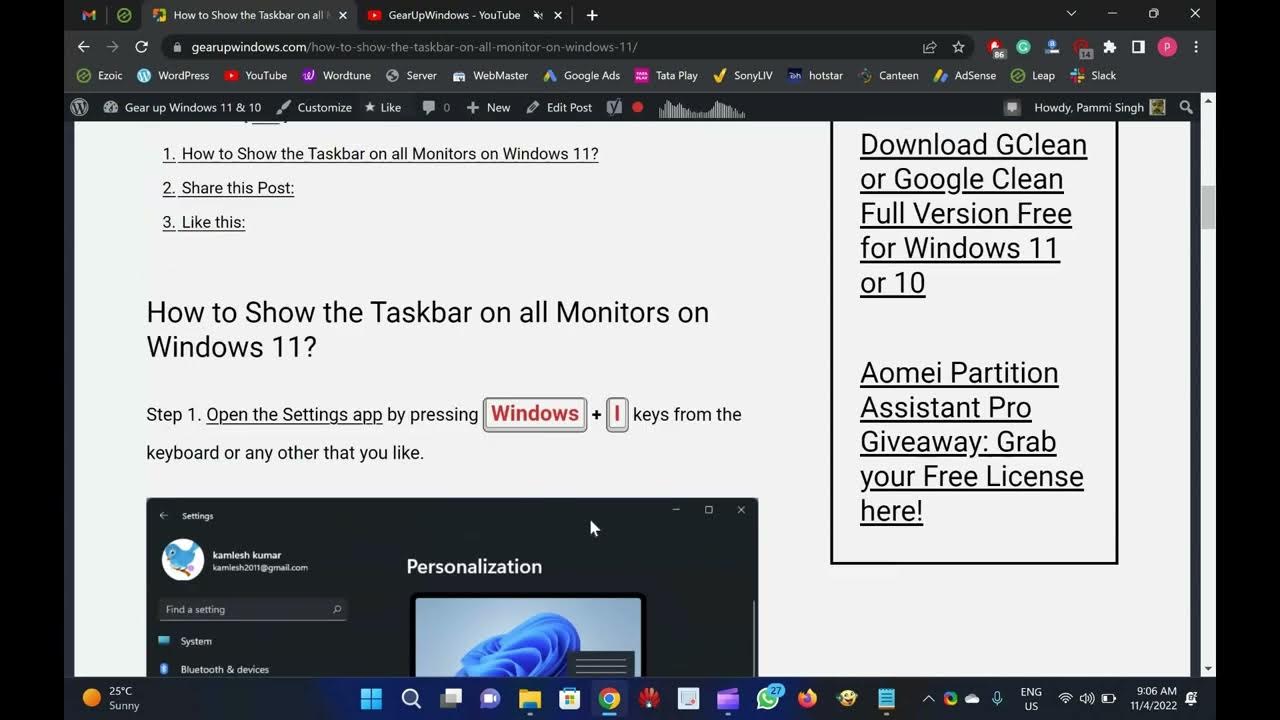
Welcome to gearupwindows youtube channel. In this video, you will learn How to Show the Taskbar on all Monitors on Windows 11. If you are using Windows 11 and adding a second monitor to extend the display, it should also show the taskbar on the second monitor. But, it does not happen. By default, when you add a second monitor on Windows 11, the taskbar is only displayed on the primary or default monitor. If you want to see the taskbar on both displays, you need to go through the Settings app. In this gearupwindows article, we will guide you on showing the taskbar on all displays on Windows 11 PC. How to Show the Taskbar on all Monitors on Windows 11? Step 1. Open the Settings app by pressing Windows + I keys from the keyboard or any other that you like. Step 2. When Windows Settings open, select the Personalization category from the left sidebar. Step 3. On the right sidebar, click Taskbar. Step 4. When you reach Taskbar settings, click the Taskbar behaviors header to expand it. Step 5. Then check the box Show my taskbar on all displays to enable the taskbar on all displays. Note: You will only be able to check this item when you have connected your secondary display to your computer. Otherwise, this option will remain greyed out. We have not connected another monitor right now to our PC, so we can't check it right now. If you have not subscribed to our channel, please subscribe to @GearUpWindows Youtube channel to get the latest tutorials. Thanks. Chapters 00:00 Introduction 00:52 How to Show the Taskbar on all Monitors on Windows 11? #windows #windows11 #tutorial #tutorials #howto #taskbar

How to Enable or Disable Tab Sleep feature in Firefox browse...
1K views · Nov 4, 2022 gearupwindows.com
Welcome to gearupwindows youtube channel. In this video, we will guide you on How to Enable or Disable Tab Sleep feature in Firefox browser. In Edge browser, there is a feature available to save the resources or memory, called Sleeping tabs. There is a similar function available in Mozilla Firefox, called Tab Sleep. This post will guide you on enabling or disabling the Tab Sleep feature in the Firefox browser. When this feature is turned on, Firefox puts inactive tabs (that you haven’t accessed for a few minutes) to sleep mode or suspends those tabs. That is a beneficial feature to save the system resources or memory. Whenever you access any of the inactive tabs, those are awakened or brought back to active mode with a refresh. How to Enable or Disable Tab Sleep feature in Firefox browser? To enable or disable the Tab Sleep feature in the Mozilla Firefox browser, perform the following steps:- Step 1. Open the Firefox browser and access the Advanced Preferences page (To access the Advanced Preferences page, launch Firefox and type about:config in the address bar and press Enter from the keyboard). Step 2. You will see a “Proceed with Caution” warning message. Click on the “Accept the Risk and Continue” button to open the “Advanced Preferences” page. Step 3. Click the “Show All.” Step 4. On the search box type lowmemory. Step 5. Double-click on the browser.tabs.unloadOnLowMemory preference to set its value to true. Note: By default, the value is set to false, which means “Tab Sleep” is disabled. To disable the Tab Sleep at any time, double-click on the browser.tabs.unloadOnLowMemory preference to set its value to false. That’s all. Once you have completed the above steps, restart Firefox, and it’ll enable/disable the Tab Suspend feature in Firefox based on the value of the preference. If you have set the value to true, whenever you are working with too many tabs and some tabs are not accessed for some minutes, Firefox will automatically suspend those idle tabs. If you have not subscribed to this @GearUpWindows channel yet, hurry up. A lot of tutorials are on the way. Thanks. Chapters 00:00 Introductions about the Tab Sleep feature in Firefox 01:04 How to Enable or Disable Tab Sleep feature in Firefox browser? #windows #windows11 #windows10 #firefox #tutorial #tutorials #howto #browser #browserfeature
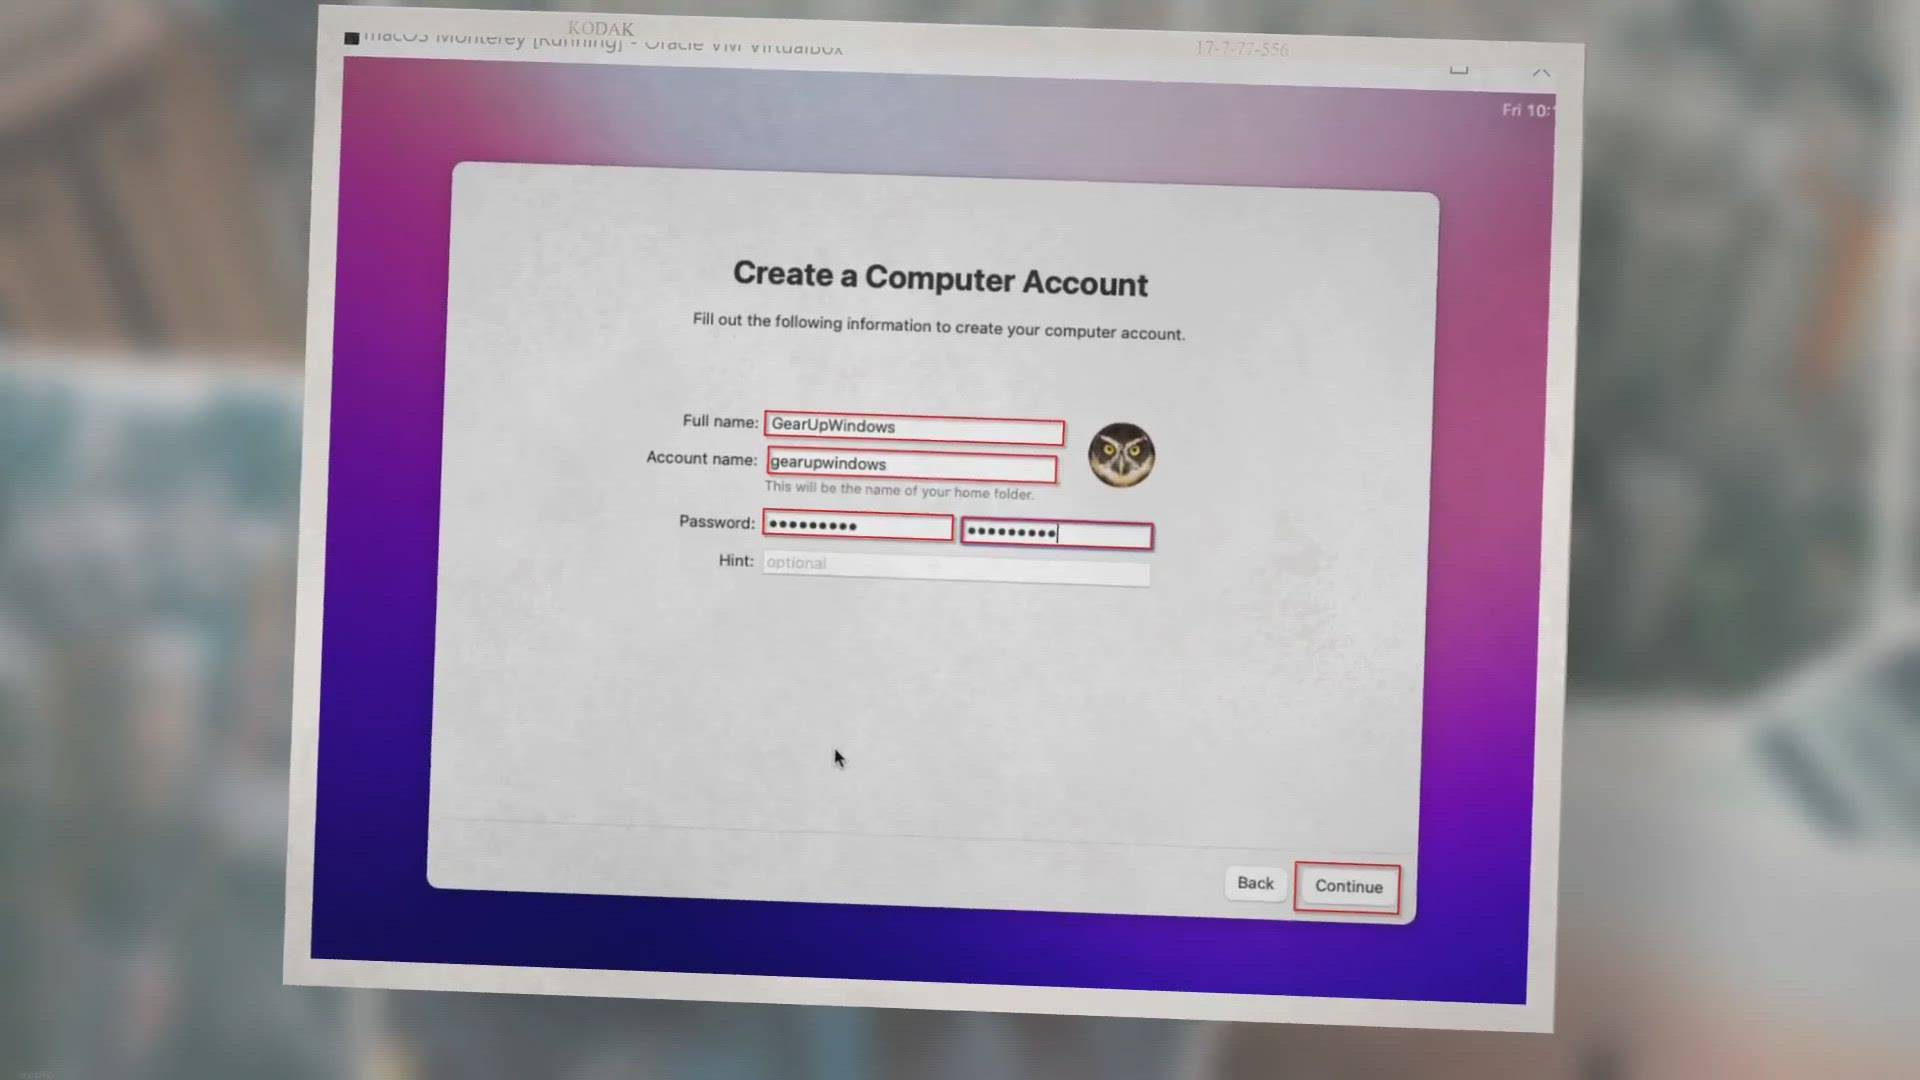
How to Install macOS Monterey in VirtualBox on Windows 11/10...
2K views · Nov 4, 2022 gearupwindows.com
We all know Apple’s macOS Big Sur is the latest stable operating system in the market. Now, the firm is ready to launch macOS Monterey for Mac. The macOS Monterey has been announced at the WWDC keynote after showing off iOS, iPadOS, and watchOS.
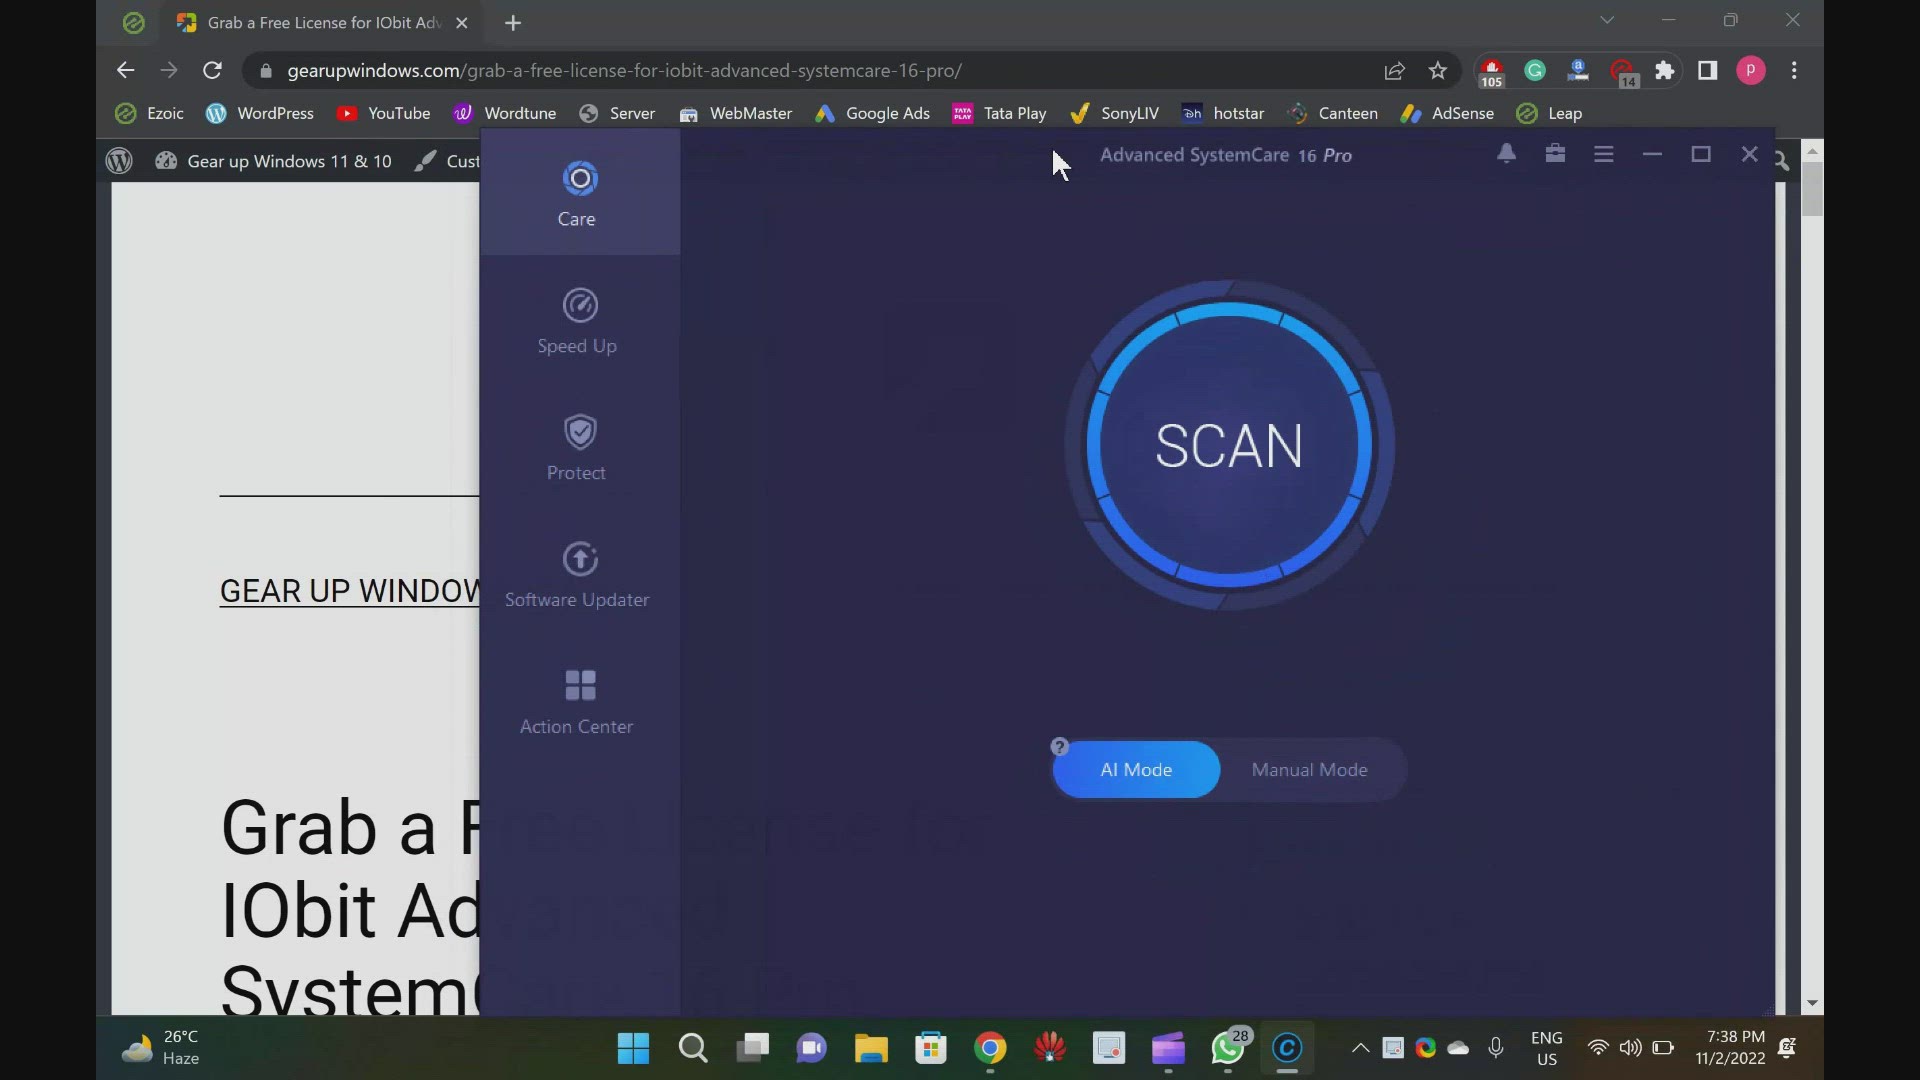
Giveaway IObit Advanced SystemCare 16 Pro
719 views · Nov 2, 2022 gearupwindows.com
Free License for IObit Advanced SystemCare 16 Pro: Giveaway Copy! Although Windows 11 and 10 offer a lot of built-in features, without third-party software, it is incomplete. You need to download a third-party pro tool to clean your PC and improve overall performance. We recommend IObit Advanced SystemCare 16 Pro if you want to juice out your PC performance. This application offers deep cleaning for Windows PCs and provides reliable protection for users’ online privacy. Performance is the primary goal of this application, while privacy protection ensures keeping online trackers out. While the free version of Advanced SystemCare (Read More: https://gearupwindows.com/iobit-advanced-systemcare-free-speed-up-clean-and-protect-your-private-data-on-windows-10/) is good enough for primary users, advanced users need a pro version. But you might already know that every program pro version costs. IObit firm is offering a giveaway for its flagship Advanced SystemCare 16 Pro program, so if you don’t want to pay for it and want to use it for free, you’re covered. Basically, you will get a pro license for free so that you can use it on your PC for free. After entering the license key in the program, IObit Advanced SystemCare 16 Free will automatically be converted to IObit Advanced SystemCare 16 Pro. Advanced SystemCare 16 Pro for Windows 11 and 10 A big SCAN button will appear when you download, install, and run Advanced SystemCare 16 Pro. You can toggle between AI Mode and Manual Mode below that. While AI Mode can be sufficient for most PCs, you can switch to Manual Mode to select and uncheck different options for scanning your computer. You can use this option if you do not have much time to maintain your computer. You will be able to scan your computer in AI Mode for privacy traces, junk files, invalid shortcuts, registry entries, system optimizations, internet improvements, registry fragments, disk optimizations, disk optimizations, antivirus protection, firewall, outdated drivers, outdated software, spyware threats, system weaknesses, security holes, and disk errors. Clicking on the Fix button, you can repair several errors at once. To learn more, you need to click on the individual entry on the left side. Next, coming to the interface of IObit Advanced SystemCare. The homepage of this application is divided into five tabs. These are the following:- Care Speed Up Protect Software Updater Action Center Let me delve into depth. Care This is the first tab of the Advanced SystemCare program, where you will find a big SCAN button to scan and fix several errors. Speed Up You can use the Speed Up tab to optimize your PC’s performance. You can enable “Turbo Boost” here to help stop unnecessary programs from releasing RAM and boost your PC’s performance. In addition, you can remove programs from Startup with “Startup Optimizer.” For a smoother PC, enable the “Performance Monitor” and “Auto RAM Clean” tools under “Real-Time TuneUp.” Protect Furthermore, Advanced SystemCare includes built-in tools for protecting your PC, such as Anti-Spyware, fingerprint protection, anti-tracking, and browsing protection. Software Updater Keeping your PC’s software up-to-date can be difficult if you have many programs installed. Advanced SystemCare keeps track of all installed programs and notifies you when one needs to be updated. You can use Advanced SystemCare to clean your PC and boost performance. It is compatible with all versions of Windows, including Windows 11, 10, 8.1/8, 7, Vista, and XP. Download IObit Advanced SystemCare 16 Pro You will need to download Advanced SystemCare 16 Free first and then enter the giveaway license key. Once you have activated the software, Advanced SystemCare 16 Pro will be ready to use. You will need to download Advanced SystemCare 16 Free (https://cdn.iobit.com/dl/advanced-systemcare-setup.exe) first and then enter the giveaway license key. Once you have activated the software, Advanced SystemCare 16 Pro will be ready to use. A3EBB-03B4F-C0C86-8DF1N The above-mentioned giveaway code is valid for the next 6 months. Update as on 11 Dec 22: Use the following license key to activate your copy of Advanced SystemCare 16 Pro:- 35EB4-71BEB-DC703-B271N Note: The above code offers a 6-months subscription, valid till April 24, 2023. Update as on 04 Jan 2023: Use the following key to get a free license for 6 months (6-month subscriptions for 100 activations, expired on Feb 15th,2023) 4039F-2DECF-5AE7B-4351N Download application: https://www.iobit.com/en/advanced-systemcare-antivirus.php?utm_source=enmedia&utm_campaign=enascu_gearupwindows If you have not subscribed yet, please visit my youtube channel @gearupwindows and subscribe to it. Thanks. Chapter 00:00 Intro 01:50 About 05:46 Download 06:08 Giveaway Free License Key #giveaway #giveaways #gearupwindows #growupwindows #risewindows #windows #windows10 #windows11 #software
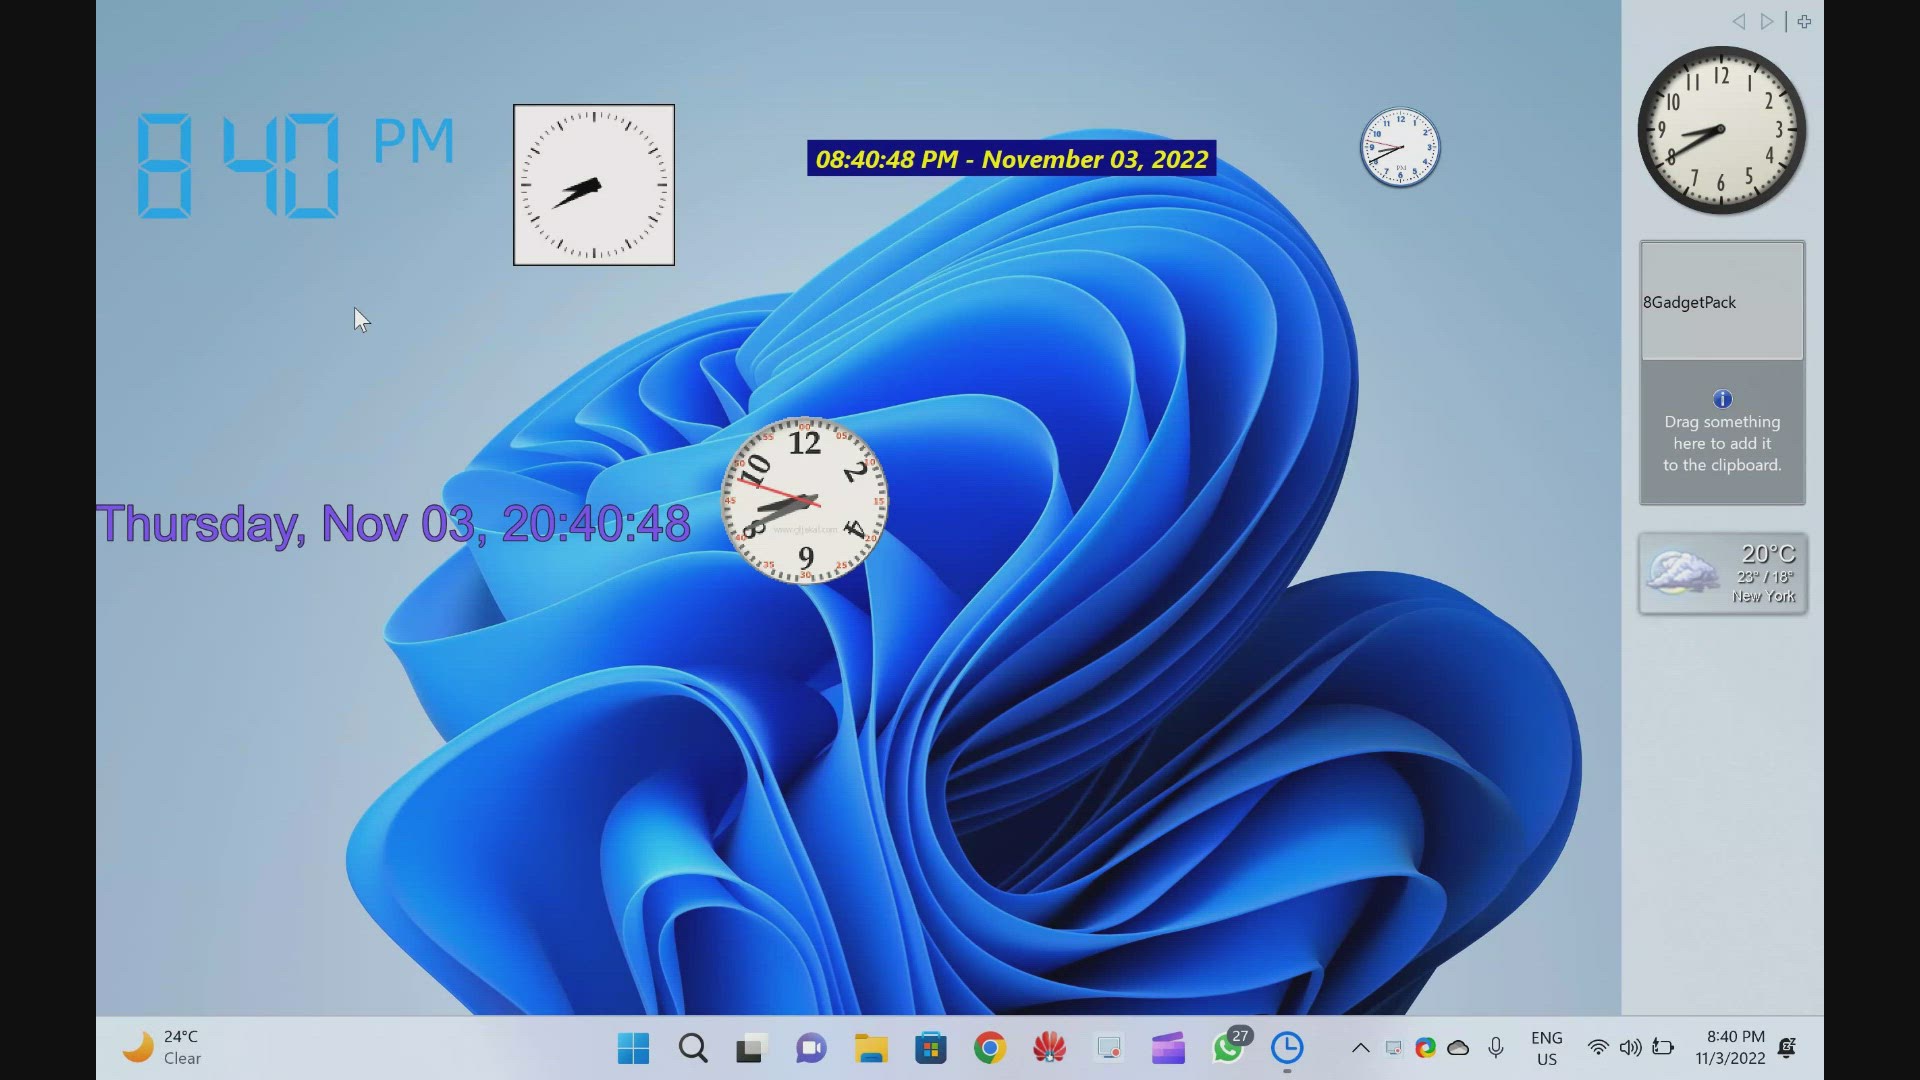
Best Free Desktop Clock Widgets for Windows 11 and 10
2K views · Nov 3, 2022 gearupwindows.com
In this video, we have provided you with details and download links for the Best Free Desktop Clock Widgets for Windows 11 and 10. Although on Windows 11 or 10 machines, you can find the time on the taskbar, some users prefer to add a clock widget on the desktop. The clock widget stays on top of other apps and can be moved to any side of the screen, making it easier to keep track of your schedule. In addition, it also enhances the appearance of your Windows desktop. In this gearupwindows article, we will cover a lot of free clock widgets that you can use on your Windows 10 or 11 desktop. Desktop Clock Widgets for Windows 11 and 10 Download Digital Clock 4: https://sourceforge.net/projects/digitalclock4/files/4.7.9/ Download .Clocks: https://apps.microsoft.com/store/detail/clocks/9NQ1TSHFWJG4?hl=en-us&gl=US Download DS Clock: https://www.dualitysoft.com/dsclock/ Download ClocX: http://www.clocx.net/download.php Download 8GadgetPack: https://gearupwindows.com/8gadgetpack-adds-more-than-60-gadgets-in-windows-11-10-8-1-7/ Download 8GadgetPack: https://8gadgetpack.net/ Download DesktopClock: https://github.com/danielchalmers/DesktopClock Download Clock!: https://www.gljakal.com/clock/index.php Subscribe to our channel @GearUpWindows Chapters 00:00 Introduction 00:50 Digital Clock 4 03:03 .Clocks 03:48 DS Clock 04:44 ClocX 05:51 8GadgetPack 06:37 DesktopClock 07:46 Clock! #windows #windows11 #windows10 #free #clocks #clock #freeware
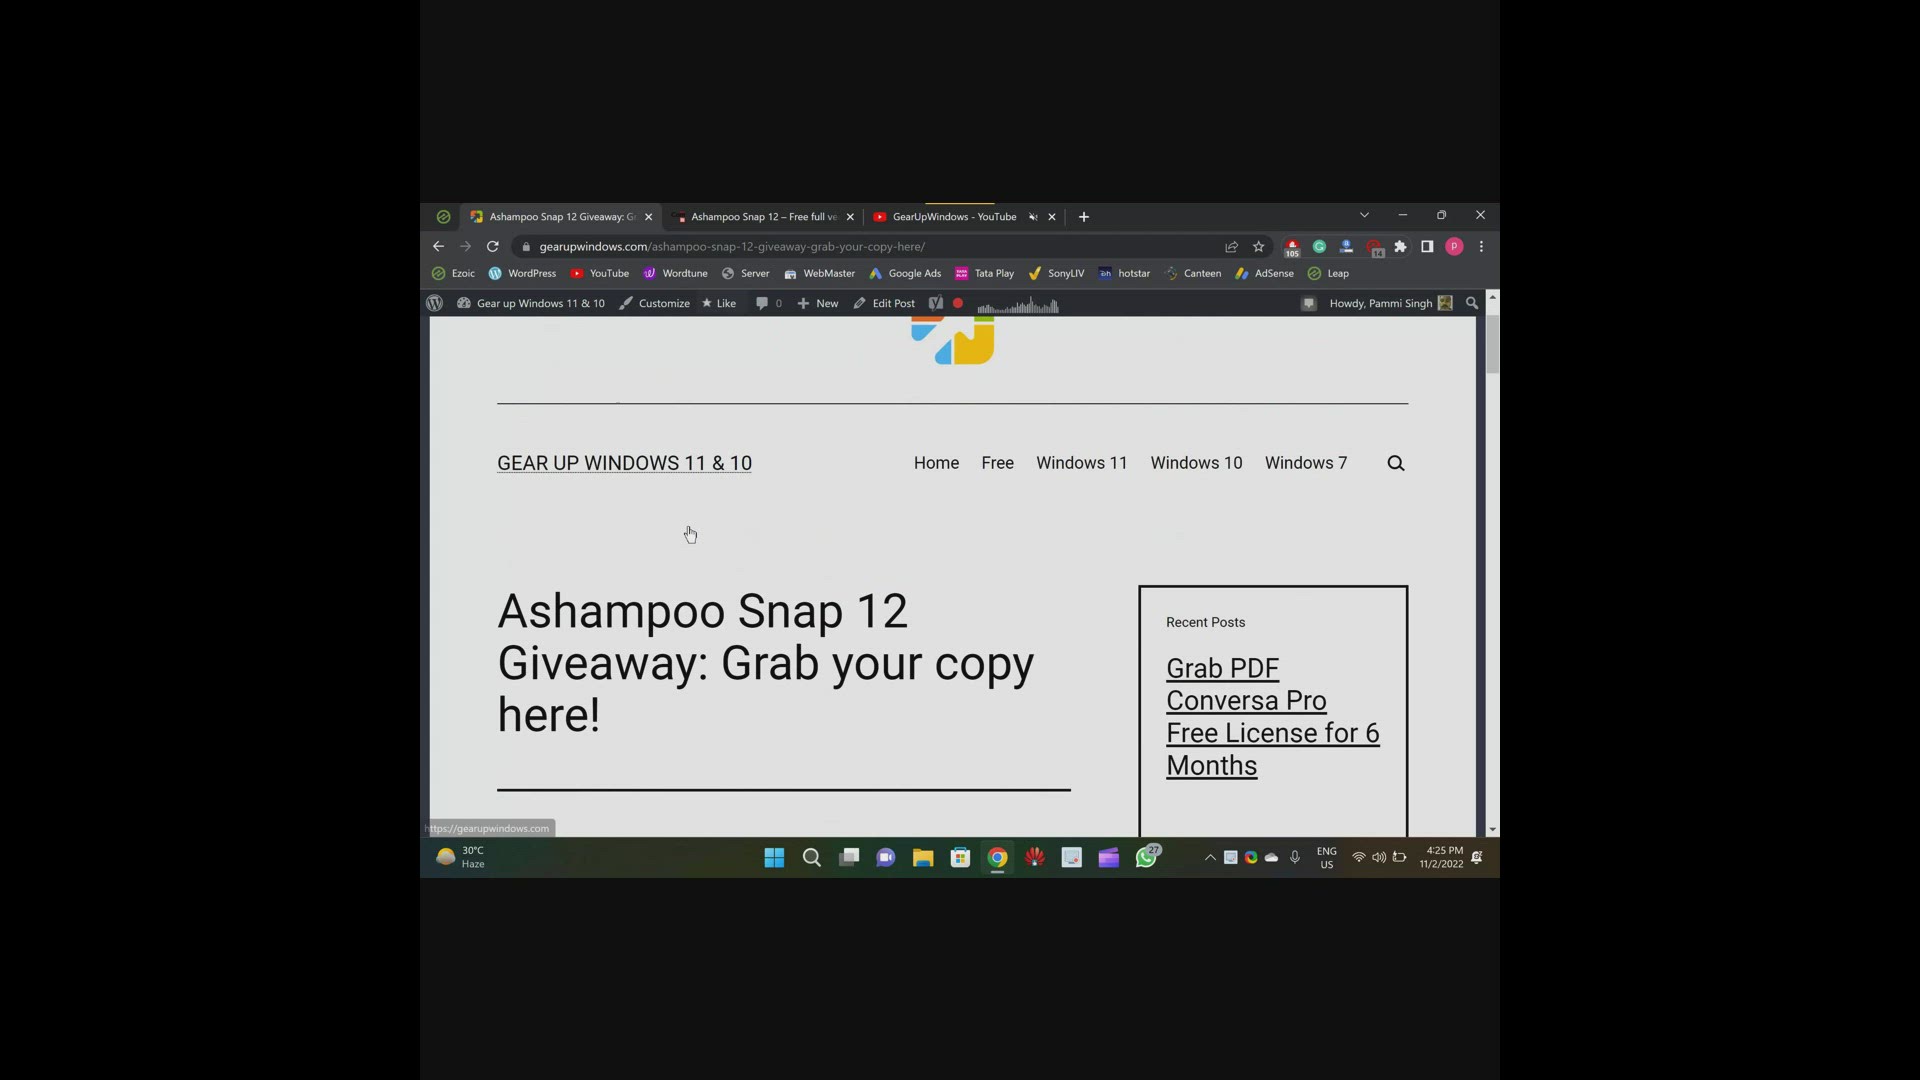
Ashampoo Snap 12 Giveaway: Grab your copy here!
3K views · Nov 2, 2022 gearupwindows.com
Welcome to the gearupwindows Youtube video channel. In this video we will show you a few details about Ashampoo Snap 12 Giveaway and also guide you to grab a free copy of this tool. INTRODUCTION If you want to take screenshots or record your desktop with ease, you can use the Ashampoo Snap tool. You need to pay at least CA$59.99 to purchase this application; however, in this giveaway, you will get it totally free. Ashampoo Snap 12 for Windows 11 and 10 With Ashampoo Snap 12, you can automate capturing screenshots or videos. You can enhance and polish screen captures with automatic numbering, arrows, comments, stickers, and so much more. With Ashampoo Snap, you can share files across all popular online and cloud services, such as Twitter, Facebook, Dropbox, OneDrive, Google Drive, and more. Videos and documentaries can be created easily with Ashampoo Snap. You can add voice narration, texts, and drawings to the recordings. You can visualize mouse clicks and keystrokes as well as watermarks to protect your intellectual property. You can also add live webcam feeds with a single click. Ashampoo Snap supports multi-display setups, including mixed Full HD and 4K environments, with different resolutions and DPI combinations. In the editor, beginners and professionals alike will have no problem getting started! Each display is captured at its own resolution for maximum sharpness, and results are instantly editable. Using Ashampoo Snap, you can also turn any video segment into a GIF animation using its built-in converter. Just set the start and end positions, fire up the converter, and you’re done! With Ashampoo Snap, you can take perfect screenshots, even in fullscreen mode of your games. Preserve your greatest triumphs, high scores, and player highlights. The built-in editor comes with a variety of tools for annotating, highlighting, and marking individual image portions, including text, comments, markers, and arrows, in addition to basic image editing functions like cropping, scaling, and rotating. Webspace and email from Ashampoo make it easy to share results, but you can also send them to other applications. In addition to printing, Ashampoo Snap can also be operated through a floating toolbar near the top edge of the screen, via the system tray icon, or via keyboard shortcuts. It is lightweight and unobtrusive on the system. Ashampoo Snap 12 Key Features Capture screenshots. Multi-purpose capture tool for rectangular areas, entire and scrollable websites. Capture fixed-size and freehand selections. Capture multiple screens as a single screenshot. Print screen. Built-in screenshot editor. Crop, scale, and rotate images. Add straight and curved arrows. Add texts and comments. Extract screen colors. Supports JPEG, PDF, PNG, and PSD formats. Create GIFs from any video. Free License of Ashampoo Snap 12 To use the full features of Ashampoo Snap 12, you don’t need to activate this application manually. This application is hosted with a pre-activated license here (https://www.computerbild.de/download/Ashampoo-Snap-12-Kostenlose-Vollversion-930250.html). To use this program on your PC, download and install it on your computer. It will not ask you for a license key. Do hurry up if you have not subscribed yet to our channel (https://www.youtube.com/@gearupwindows). Thanks. Chapters 00:00 Ashampoo Snap 12 Intro 03:18 Ashampoo Snap 12 Features 04:11 Ashampoo Snap 12 Free License Key #windows #windows11 #windows10 #giveaway #free #software
PDF Conversa Pro Free License for 6 Months
2K views · Nov 2, 2022 gearupwindows.com
Welcome to gearupwindows youtube channel (https://www.youtube.com/@gearupwindows). In this video, we will provide short details about PDF Conversa Pro and also provide a free license. PDF Conversa Pro is a professional PDF tool used to convert any file format to PDF. Its regular license code price is 20.00 USD, but in the giveaway period, you will get it completely free for 6 months. Even you can update this tool and ask the developer if there are any issues. PDF Conversa Pro for Windows 11 and 10 The Ascomp PDF Conversa Pro is compatible with Windows XP to 11, which means you can use it with your latest version of Windows 11 and 10 too. Using this application, you can quickly convert PDF documents into a Word format DOC/RTF or convert Word documents into PDF. Conversion of PDF to Word is also possible into the Word file format DOC or RTF with a few mouse clicks. After converting the documents also, the graphics, tables, and fonts associated with the basic layout remain unchanged. It even allows you to convert password-protected documents. During the conversion of DOC/DOCX to PDF, if you need, you can set passwords in your Word documents. This application allows you to integrate custom fonts into the PDF file. During conversion, you can select texts to be compressed and even determine the picture quality of the contained graphics. Send documents in your desired format or edit existing ones in your preferred file format. PDF Conversa processes the transformation with just one click. Free License of PDF Conversa Pro To get the free license of PDF Conversa Pro, just visit this giveaway page (https://www.ascompsoftware.com/fullversion/?l=QKKHX-91XQ4-7AG6P-APCTL), fill out the form, and hit the “Send” button. When you’re done, you will receive a confirmation email from ASCOMP Software. Open up your email and click the confirmation link. Once done, you will be directed to your ASCOMP account page, where you can download the full version setup file. By clicking the “Download Full Version” link, you can download the installer of this software. You can copy the license code from the giveaway page and then apply it to the software to activate it for free if needed. Thanks. Chapters 00:00 PDF Conversa Pro Intro 02:14 PDF Conversa Pro Free License and Download #windows #windows11 #free #windows10 #giveaway #giveaways #software
2 Ways to Reset Windows Security App in Windows 11
6K views · Nov 2, 2022 gearupwindows.com
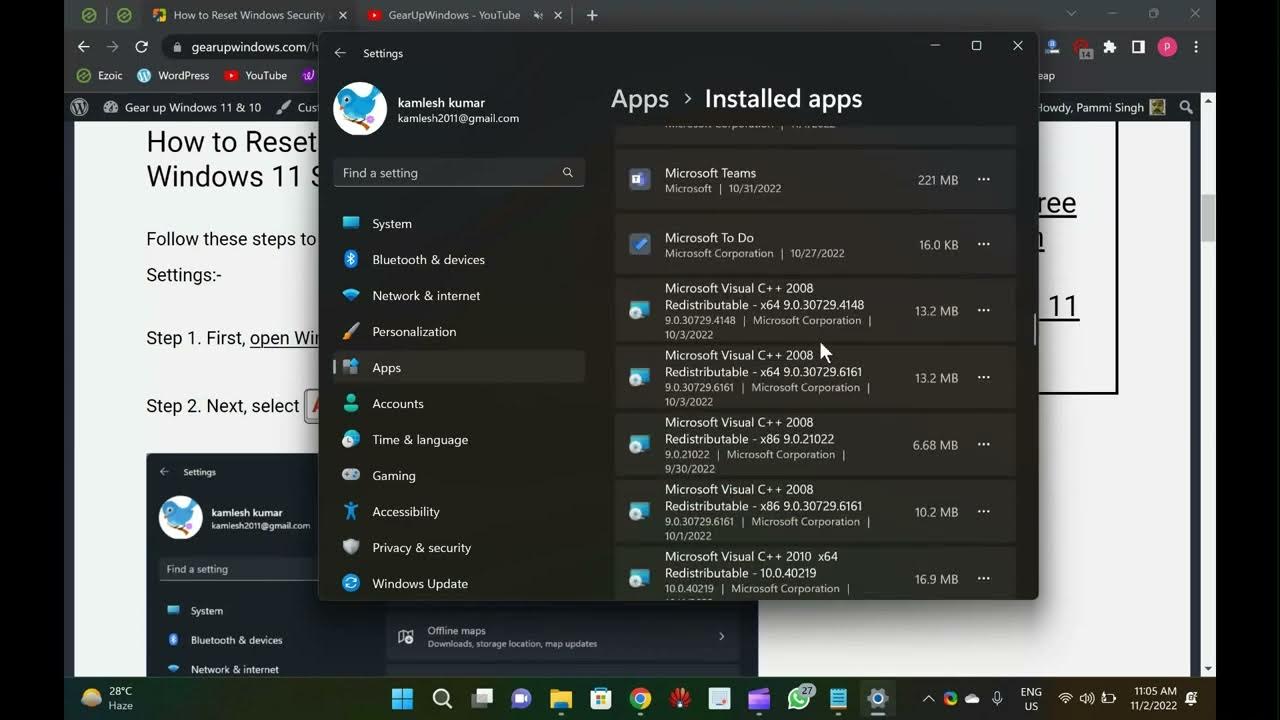
Welcome to @GearUpWindows youtube channel. In this video, you will learn to Reset Windows Security App in Windows 11. Windows Security is a built-in app on Windows 11. It is not an anti-virus or anti-malware application but an information center. When you enable Microsoft Defender on your PC, it collects and reports device health and threat information. Then, you can take action, such as enabling additional security features and running security scans through Microsoft Defender. However, if the Windows Security application crashes or does not open properly, resetting or re-registering may solve the problem. In this gearupwindows article, we will guide you through several ways to reset the built-in Windows Security app on Windows 11. You can reset the Windows Security app using built-in Settings or PowerShell. Please note that regardless of the method you use to reset the Windows Security app, resetting will restore all its settings to their default values. How to Reset the Windows Security through Windows 11 Settings? Follow these steps to reset the Windows Security app using Windows 11 Settings:- Step 1. First, open Windows 11 Settings (https://www.youtube.com/watch?v=F1GqsRg5TqM). Step 2. Next, select Apps in the left sidebar. Step 3. Then, click on Installed apps in the right sidebar. Step 4. In the “Installed apps” settings page, scroll down and click on the three dots menu beside the Windows Security entry. Step 5. Then, click on the Advanced options in the menu. Step 6. In the following screen, click the Reset option. Step 7. Again, click the Reset button when prompted. How to Reset the Windows Security using PowerShell? To reset the Windows Security through PowerShell, use these steps:- Step 1. Open Windows PowerShell as an administrator. To do that, open the Run dialog box by pressing the Windows+R keys simultaneously on the keyboard. Then, type PowerShell and press Ctrl+Shift+Enter on the keyboard. If prompted by UAC, click the Yes button. Step 2. Then, copy and paste the following command in the elevated Windows PowerShell and press Enter key on the keyboard:- Get-AppxPackage Microsoft.SecHealthUI -AllUsers | Reset-AppxPackage Chapters 00:00 Intro 01:26 How to Reset the Windows Security through Windows 11 Settings? 02:33 How to Reset the Windows Security using PowerShell? #windows #windows11 #settings #tutorial #tutorials
3 Ways to open Control Panel in Windows 11
499 views · Nov 2, 2022 gearupwindows.com
Welcome to gearupwindows youtube channel. In this video, you will learn to open Control Panel in Windows 11. How to open Control Panel in Windows 11? Many rumors were that Microsoft was removing the classic Control Panel from Windows 10; however, Windows 11 has been launched, and it is still part of it. To install Windows 11, your PC should feature Secure Boot and TPM 2.0 enabled on BIOS/UEFI. However, if you are using an old Windows PC or Mac machine, you can bypass Secure Boot and TPM 2.0 and install Windows 11. You can even install Windows 11 on a VirtualBox Virtual Machine; all you need to bypass TPM 2.0 and Secure Boot. Since Control Panel is part of Windows 11, you can access it in several ways. Some of them are the following:- Using Run box Through Windows Search From Command prompt How to open or access Control Panel using the Run box on Windows 11? Step 1. Open the Run dialog box by pressing Windows + R keys simultaneously from the keyboard. Step 2. In the Run box, type Control or Control Panel and hit Enter from the keyboard or click the OK button. Once you complete the above steps, the Control Panel window will open. How to open or access Control Panel through Windows Search on Windows 11? This is another easiest way to open Control Panel on Windows 11. Step 1. Click on the Start button or Windows logo icon on the taskbar. Step 2. On the search box, type Control Panel. From the available results, click on the Control Panel app to open it. How to open or access Control Panel from Command Prompt on Windows 11? If you prefer to use Command Prompt, do the following steps:- Step 1. Click on the Start button or Windows logo icon on the taskbar. Now, type Command Prompt in the search box. Step 2. From the available top results, click on the Command Prompt app to open it. On the prompt, type Control Panel and hit Enter from the keyboard to launch it. Chapters 00:00 Introduction 01:23 How to open or access Control Panel using the Run box on Windows 11? 01:57 How to open or access Control Panel through Windows Search on Windows 11? 02:30 How to open or access Control Panel from Command Prompt on Windows 11? #windows #windows11 #tutorial #tutorials #controlpanel

SysInfo Displays Detailed PC Specs and Monitors Real-Time Ha...
5K views · Nov 2, 2022 gearupwindows.com
Welcome to gearupwindows youtube channel. In this video, you will learn about SysInfo tool that Shows Detailed PC Specs and Monitors Real-Time Hardware Temperature. Have you purchased a new computer and want to see all the hardware components? When you purchase a new computer or upgrade an old PC, you should review the hardware. IObit has launched new software that is called SysInfo. Many applications are available on the market to view the PC specs in detail, for instance, Speccy. It is also possible to view our PC specs without any third-party tool on Windows 11. SysInfo for Windows 11 or 10 SysInfo is a great tool that scans your computer in a few seconds and represents the list of hardware components in a single window. It is compatible with Windows 11, 10, 8.1, 8, 7, Vista, and XP. To quickly find the detailed specification of your computer, download and install the SysInfo application from its official website. After installing, double-click on the desktop shortcut icon of this software to launch it. At the bottom of this software, you can view the temperature of the main components like CPU, GPU, Hard Disk, and Motherboard. Clicking on the same, you can see in detail. SysInfo app also includes an Export button on the left-bottom. Using this button, you can export reports from any category. It saves reports in a .HTML file. Summary That’s it. Now, you can view all the details about your computer here. SysInfo is divided into several categories. When you open this application, you will be greeted with a summary of your PC. Here, you can find basic details of your computer or laptop, including operating system, processor, memory (RAM), graphics card (GPU), monitor, disk space, audio card, motherboard, mouse, and keyboard. Operating System In the Operating System category, you can view computer name, user name, organization (if applicable), OS name, OS version, product id, system uptime, registry size, etc. Processor & Motherboard You can view CPU and motherboard details in the same category under the SysInfo application. Here, you can find processor make and speed, CPU clock speed, voltage, serial number of CPU, L1, L2, and L3 cache. Further, you can view the motherboard model, manufacturer, serial number, BIOS maker & version, and a lot of information. Memory Device Under this category, you can view installed RAM, memory usage, free RAM at present, memory usage percentage, etc. Display You can look for video adapters and monitor here. Download SysInfo You can download SysInfo free app from its official website (https://www.iobit.com/en/system-information.php). #free #freeware #windows #windows11 #windows10 #software
How to Enable Wallpaper Slideshow in Windows 11
6K views · Nov 2, 2022 gearupwindows.com
Welcome to gearupwindows youtube channel. In this video, you will learn to open Control Panel in Windows 11. How to open Control Panel in Windows 11? Many rumors were that Microsoft was removing the classic Control Panel from Windows 10; however, Windows 11 has been launched, and it is still part of it. To install Windows 11, your PC should feature Secure Boot and TPM 2.0 enabled on BIOS/UEFI. However, if you are using an old Windows PC or Mac machine, you can bypass Secure Boot and TPM 2.0 and install Windows 11. You can even install Windows 11 on a VirtualBox Virtual Machine; all you need to bypass TPM 2.0 and Secure Boot. Since Control Panel is part of Windows 11, you can access it in several ways. Some of them are the following:- Using Run box Through Windows Search From Command prompt How to open or access Control Panel using the Run box on Windows 11? Step 1. Open the Run dialog box by pressing Windows + R keys simultaneously from the keyboard. Step 2. In the Run box, type Control or Control Panel and hit Enter from the keyboard or click the OK button. Once you complete the above steps, the Control Panel window will open. How to open or access Control Panel through Windows Search on Windows 11? This is another easiest way to open Control Panel on Windows 11. Step 1. Click on the Start button or Windows logo icon on the taskbar. Step 2. On the search box, type Control Panel. From the available results, click on the Control Panel app to open it. How to open or access Control Panel from Command Prompt on Windows 11? If you prefer to use Command Prompt, do the following steps:- Step 1. Click on the Start button or Windows logo icon on the taskbar. Now, type Command Prompt in the search box. Step 2. From the available top results, click on the Command Prompt app to open it. On the prompt, type Control Panel and hit Enter from the keyboard to launch it. Chapters 00:00 Introduction 01:23 How to open or access Control Panel using the Run box on Windows 11? 01:57 How to open or access Control Panel through Windows Search on Windows 11? 02:30 How to open or access Control Panel from Command Prompt on Windows 11? #windows #windows11 #tutorial #tutorials #controlpanel
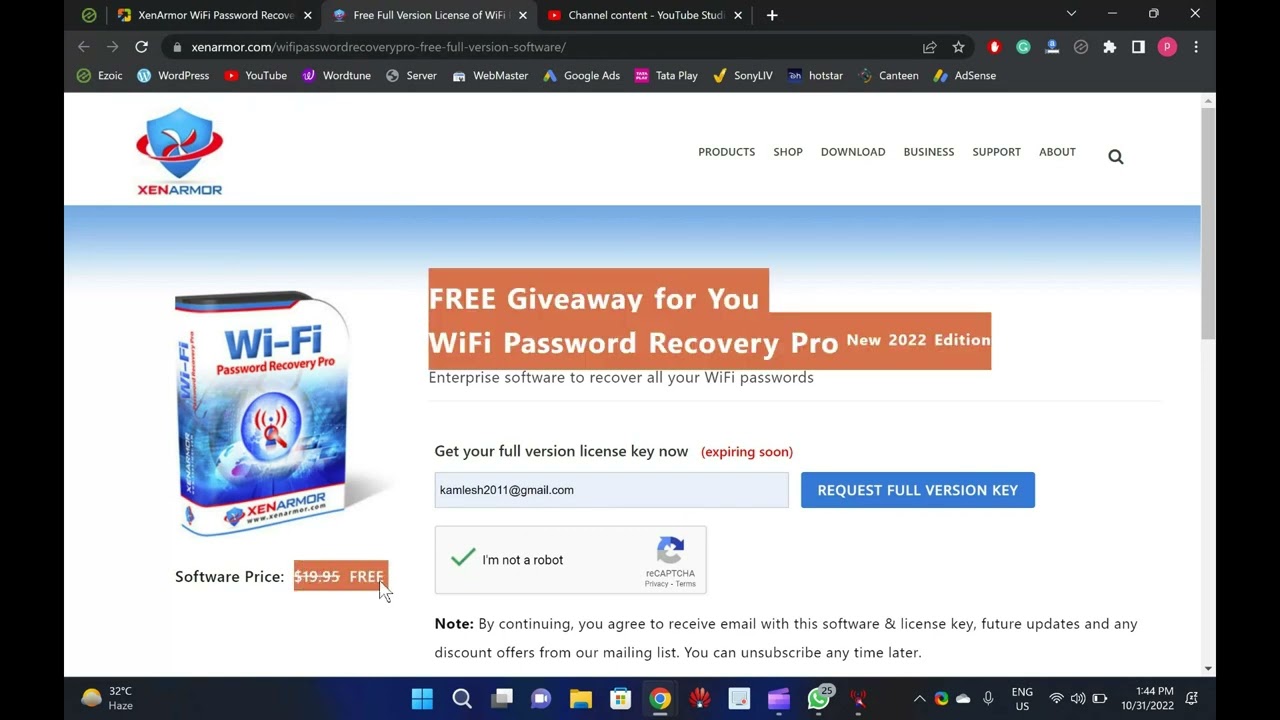
XenArmor WiFi Password Recovery Pro Free License
3K views · Oct 31, 2022 gearupwindows.com
Welcome to gearupwindows youtube channel. In this video, you will learn about XenArmor WiFi Password Recovery Pro and also get a free key to activate your copy of this software. In fact, passwords are such a secret weapon that no one wants to share them. After connecting to a WiFi network, people save them and forget them. And when you want to view the saved password, Windows makes it difficult for you to do so. XenArmor WiFi Password Recovery Pro for Windows 11 and 10 XenArmor WiFi Password Recovery Pro is an easy-to-use application that lets you instantly recover your saved WiFi password as well as delete all the Wireless Passwords from your computer. As soon as you have downloaded, installed, and launched the software on your computer, it will automatically detect all your Wi-Fi profiles and recover the passwords for them. A complete list of Wi-Fi profile details is displayed, including Wi-Fi SSID name, Security Settings (WEP, WPA, WPA2, WPA3), Type, and Wi-Fi Password for each recovered profile. By analyzing the password security configuration of each Wireless Profile, it categorizes them as Dangerous, Vulnerable, Warning, and Good. Features of XenArmor WiFi Password Recovery Pro Decrypts and discovers all Wireless Passwords on your system instantly. Allows removing one or more Wi-Fi Password Profiles. Identifies security issues faster with a multi-colored report. Password recovery is supported for all wireless protocols, including WEP, WPA, WPA2, WPA3, etc. Command-line supported. Generate WiFi password report in HTML, CSV, XML, JSON, SQLite database file format. 32-bit and 64-bit operating systems (Windows Vista to 11) supported. Get a Free License for XenArmor WiFi Password Recovery Pro In order to get the free license for XenArmor WiFi Password Recovery Pro, visit the giveaway page (https://xenarmor.com/wifipasswordrecoverypro-free-full-version-software/) and enter your email address. Then, click on the REQUEST FULL VERSION KEY button. On the same page, the setup file of the application, as well as the license, will appear. Apart from that, you will also get an email with the above-mentioned details. Just download the setup file, install it on your computer and activate the license to enjoy a pro copy for one year. 00.00 Intro 01:38 Features XenArmor WiFi Password Recovery Pro 02:37 Free License for XenArmor WiFi Password Recovery Pro #windows #windows11 #windows10 #free #giveaway #software #giveaways
8 Ways to Open Device Manager in Windows 11
4K views · Oct 31, 2022 gearupwindows.com
Welcome to gearupwindows youtube channel. In this video, you will learn to Open Device Manager in Windows 11. How to Open Device Manager in Windows 11? Device Manager is a built-in component of the Microsoft Windows operating system that enables users to view and control the hardware attached to their computer. If hardware isn’t working correctly, the offending hardware remains highlighted in the device manager that helps you troubleshoot. The Device Manager includes several devices, including a keyboard, mouse, hard disk drives, USB devices, etc. It sorts out all hardware, listing them based on various criteria, and when appliance malfunctions or stops working, it immediately notifies the user. Thus, you can use Device Manager to control devices, enable or disable them, configure them, identify conflicts between devices, and much more. On a Windows 11 PC, you can open Device Manager in several ways. We will review them one by one. How to Open Device Manager in Windows 11 with Quick Link Menu? Perhaps, the easiest way to launch Windows 11 Device Manager is through the Quick Link menu. For that, please right-click on the Start button on the taskbar and select Device Manager to open it. Note: The Quick Link Menu is also known as Power User Task Menu, Power User Hotkey, WinX Menu, or WIN+X Menu. You can also open the Device Manager by first opening the WinX menu (Windows + X keys) and pressing the M key. How to Access Windows 11, Device Manager, from Windows Tools Menu? Step 1. Click on the Start icon on the taskbar and select the All apps button. Step 2. Then, scroll down to the next screen and click Windows Tools. Step 3. In the Windows Tools folder, double-click Computer Management to open it. Step 4. In Computer Management, select the Device Manager option in the left panel to open the same. How to Open Device Manager in Windows 11 through Windows Search? Step 1. Click on the Search button on the taskbar. Alternatively, press Windows + S hotkey to open the Search panel. Step 2. Then, type device manager and click the same in the search result. How to Open Device Manager on Windows 11 using the Run box? Step 1. First, press Windows + R keyboard shortcut to launch the Windows Run box. Step 2. Then, type the following and hit Enter key on the keyboard:- devmgmt.msc or, hdwwiz.cpl How to Launch Device Manager in Windows 11 from Control Panel? Device Manager can also be launched from the Control Panel. For that, do the following:- Step 1. At first, open Control Panel. Step 2. Then, set “View by” to “Large icons.” Step 3. Finally, click the Device Manager. How to Open Device Manager in Windows 11 via Command Prompt or Windows PowerShell? Step 1. Open Command Prompt or Windows PowerShell. Step 2. On the prompt, type the following and hit Enter key on the keyboard:- devmgmt.msc or, hdwwiz.cpl How to Open Device Manager in Windows 11 by System Properties? The System Properties of Windows also allows accessing Device Manager. Here is how to do it. Step 1. First, press Windows + R keyboard shortcut to launch the Windows Run box. Step 2. Then, type the following and hit Enter key on the keyboard to open the System Properties window:- sysdm.cpl Step 3. Select the Hardware tab in the System Properties window. Step 4. In the Hardware tab, click the Device Manager button to open it. How to Open Device Manager in Windows 11 from File Explorer? Step 1. Open the File Explorer and navigate to “C:\Windows\System32.” Step 2. Find and double-click on devmgmt or hdwwiz.cpl to open Device Manager. Chapters 00:00 Intro of Device Manager 01:29 How to Open Device Manager in Windows 11 with Quick Link Menu? 02:14 How to Access Windows 11, Device Manager, from Windows Tools Menu? 02:55 How to Open Device Manager in Windows 11 through Windows Search? 03:22 How to Open Device Manager on Windows 11 using the Run box? 03:57 How to Launch Device Manager in Windows 11 from Control Panel? 04:31 How to Open Device Manager in Windows 11 via Command Prompt or Windows PowerShell? 05:06 How to Open Device Manager in Windows 11 by System Properties? 05:59 How to Open Device Manager in Windows 11 by System Properties? #windows #windows11 #devicemanager #tutorial #tutorials
How to Open Disk Management in Windows 11?
863 views · Oct 31, 2022 gearupwindows.com
Welcome to gearupwindows youtube channel. In this video, you will learn to Open Disk Management in Windows 11. How to Open Disk Management in Windows 11? Disk Management is a built-in utility on Windows 11 that manages internal and external hard drives. Using this built-in tool, you can even manage your USB flash drive. That means whatever external hard drives are possible to connect to your PC can be partitioned, formatted, or deleted. This tool also allows you to extend or shrink an existing partition. You can change the drive letter easily using built-in Disk Management. Now, you understand the importance of the Disk Management tool, let me proceed with some of easily step through which you can access it on Windows 11. How to Open Disk Management using Quick Access Menu? To open the Disk Management tool using the Quick Access menu, do the following:- Step 1. Perform a right-click on the Start button on the taskbar or press the Windows + X keyboard shortcut to launch the Quick Access menu. Step 2. Select Disk Management from the pop-up menu to open it. How to Launch Disk Management from Windows Search? To launch the Disk Management tool from the Windows Search menu, do the following:- Step 1. Click the Search button to open the taskbar’s Search’ menu. Step 2. Now, type Create and format hard disk partitions in the text field at the top, and then click on the relevant search result to open it. How to Open Disk Management using Run Command? To open the Disk Management tool using the Run command, do the following:- Step 1. Press Windows + R keys from the keyboard to open the Run dialog box. Step 2. In the Run dialog box, type the following and hit Enter from the keyboard:- diskmgmt.msc How to Open Disk Management using PowerShell or Command Prompt? Step 1. Open Windows Terminal, PowerShell, or Command Prompt, whatever you prefer to use. Step 2. On the prompt, type the following and then hit Enter from the keyboard:- diskmgmt Chapters 00:00 Intro above Disk Management 00:50 How to Open Disk Management using Quick Access Menu? 01:15 How to Launch Disk Management from Windows Search? 01:40 How to Open Disk Management using Run Command? 02:08 How to Open Disk Management using PowerShell or Command Prompt? #windows #windows11 #diskmanagement #tutorial #tutorials
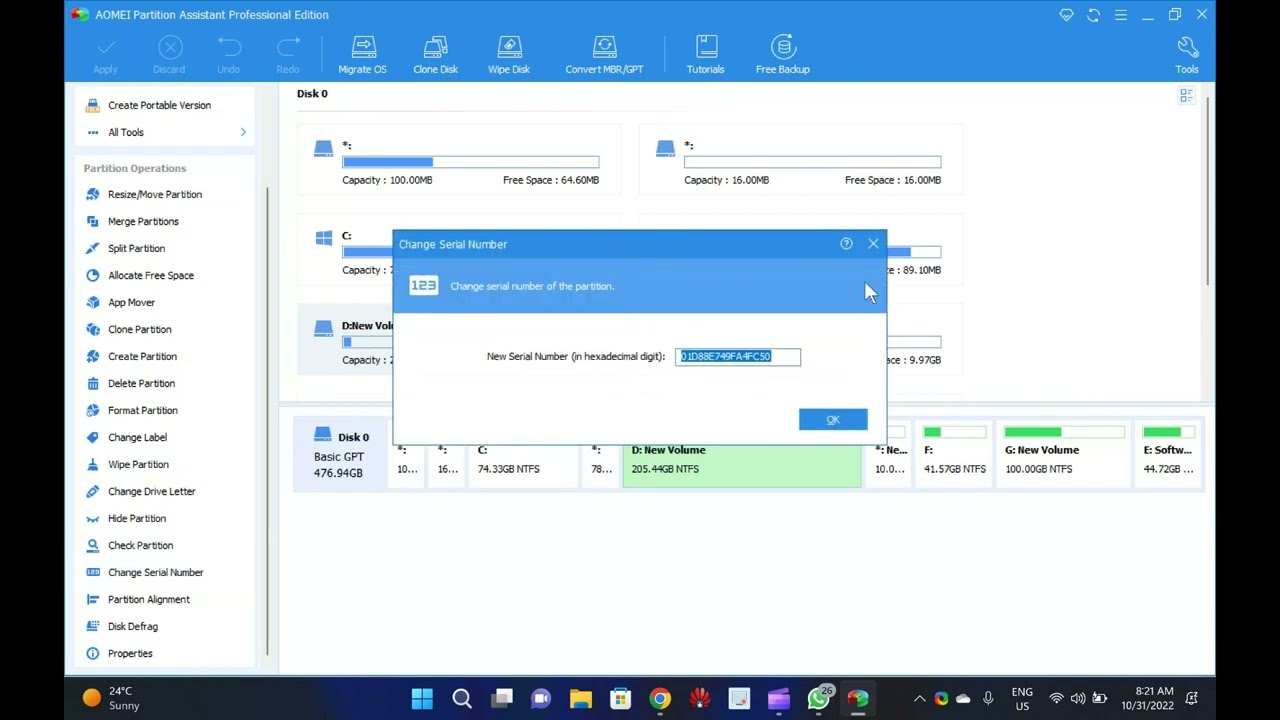
Aomei Partition Assistant Pro Giveaway: Free License
76K views · Oct 31, 2022 gearupwindows.com
Welcome to gearupwindows youtube channel. In this video, you will learn about Aomei Partition Assistant Pro and also get a free license for this professional tool. Aomei Partition Assistant Professional is a well-known application to manage partitions on Windows 11 and 10 PCs. The software costs $ 39.95 for 2 PCs/license. But, in this giveaway, you will get Aomei Partition Assistant Pro 9.12 totally free for 1 year. Aomei Partition Assistant Pro for Windows 11 and 10 The Aomei Partition Assistant Pro comes with a user-friendly interface that simplifies disk partition management and makes it safer than ever for your PC. In order to maximize disk space, it allows you to create, resize, move, merge, and split partitions without losing any data. In addition to disk conversion between MBR and GPT, OS migration, Windows 11/10/8 To Go, and filling sectors with random data, the application also includes DoD 5220.22-M and Gutmann wiping methods. With this software, you can easily manage large amounts of hard drive space. By doing so, you can separate your operating system from your data and create several partitions on your computer without touching your personal information. This Partition Assistant allows you to create, copy, manage and recover partitions, migrate your operating system from a hard drive to an SSD, and convert file formats with ease. In addition to resizing, moving, merging, splitting, and copying partitions, you can allocate free space between partitions, copy your operating system from a hard drive (HDD) to a solid-state drive (SSD), and more. Additionally, you can recover lost or damaged partitions, rebuild the master boot record, and run from a bootable CD. Key Features of Aomei Partition Assistant Pro Resize/extend partition without data loss to maximize disk space usage. Compatible with Windows 11 and 10. Supports hard disks with 4096 bytes sector size. Allows installing Windows 11 on a USB memory stick with Windows to Go technology. Can create Windows PE bootable media without installing AIK/WAIK. Support MBR and GPT disks. Migrate OS to SSD or HDD without reinstalling Windows from scratch. Convert system or data disk between MBR and GPT styles. Convert MBR System Disk to GPT for Windows 11 Upgrade. Recover lost or deleted partitions to get data back. Move apps and folders from one drive to another to free up space. Aomei Partition Assistant Professional: FREE License Key As mentioned before, AOMEI has hosted a giveaway for its flagship program, Partition Assistant Professional. That means without paying anything; you can run this program for 1 year totally free. To activate your copy of Aomei Partition Assistant Professional v9.12, download the giveaway copy of this application from here (https://www2.aomeisoftware.com/download/pa/PAssist_ProDemo.exe) and install it on your computer. After installing this tool, launch it on your computer and click Register on the application interface. Here, enter the following license key to activate this software:- AOPR-JVSO3-VR98Y-X3Z6M That’s it. Chapters 00:00 Intro 02:06 Key Features of Aomei Partition Assistant Pro 03:05 Aomei Partition Assistant Professional: FREE License Key #windows #windows11 #software #free #giveaway #giveaways
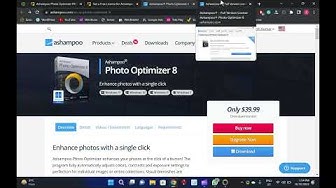
Ashampoo Photo Optimizer 8: Get a Free License
31K views · Oct 31, 2022 gearupwindows.com
In this video, you will learn about Ashampoo Photo Optimizer 8 and also get a Free License for this software. In our previous article, we discussed Ashampoo Photo Optimizer FREE, but as you know, Free applications have a number of limitations when compared to a Pro version. The good news is that the firm is offering free licenses for Photo Optimizer 8 for a limited time. So, in this giveaway period, you can activate Ashampoo Photo Optimizer 8 for totally free. Ashampoo Photo Optimizer 8 for Windows 11 and 10 A single click of your mouse enhances your photos with Ashampoo Photo Optimizer. In addition to detecting and correcting visual blemishes through careful image analysis, the application can also be used to apply numerous effects. It can adjust colors, contrasts, and exposure settings to perfection for individual images or entire collections. Easily remove minor blemishes like red eyes, skin imperfections, and stains with a straightforward user interface. The secret of the new Photo Optimizer lies in its one-of-a-kind image optimization. It meticulously examines every single image for potential weaknesses and improvements. Photos taken with a cellphone camera can now be recovered! The advanced algorithms in Photo Optimizer detect dull colors, unfavorable lighting, and lack of contrast. After analyzing your photos, they’re recreated and now full of vibrancy and life–just what a good photo should be! Despite how good auto-optimization is, there will come a time when manual adjustments need to be made. Even more individual fine-tuning options are available in Version 8, including color temperature adjustments that can completely transform a shot–and energize the “cold” cellphone images we all know. When working with RAW photos, tone curves are one of the best ways to enhance shadows, mid-tones, and highlights! The integrated backup system allows you to revert any changes and restore your original image in a flash. There is no need to read a manual with Photo Optimizer. All functions are arranged into intuitively named categories, and you are never more than two clicks away. Where other photo editors require you to read manuals, Photo Optimizer does it for you! There is no learning curve with Ashampoo Photo Optimizer, whether you are a beginner or an advanced user. Or maybe you just don’t want to spend hours tweaking images. In addition to auto-optimization, Photo Optimizer offers many sophisticated features, such as sharpening or softening specific portions of images. The app includes a variety of effects for the artist, such as waves, swirls, and even implosion and explosion, for you to experiment with. You can reduce image noise, adjust color temperatures, crop images, and even adjust color temperature. Since Ashampoo Photo Optimizer 8 does so much fully automatically, it also includes batch processing to save you time and nerves as it processes your entire photo library at once. You can select individual images or entire folders to be optimized by Photo Optimizer. Each image is analyzed meticulously, and its quality is tailored based on its unique characteristics. Put the fun back into photography by batch-processing your entire vacation, polishing your wedding or birthday photos, and more. Free License of Ashampoo Photo Optimizer 8 The program is fully compatible with Windows 7, 8, 10, and 11. To avail of the giveaway license, just download it from its official website, which regular cost is US $39.99. Install it on your computer. Launch the application and register for an Ashampoo account if you don’t already. Now, navigate to the giveaway page (https://www.ashampoo.com/frontend/registration/php/trial_step1.php?edition_id=mhyfk6eu3ftr5nlipsnngfscerwm89nz), enter your email address and click on the Request full version key button. On the following page, enter the Ashampoo account password and click on the Log in button. When you’re done, the license code will appear on the Ashampoo webpage. Copy the code and activate your Ashampoo Photo Optimizer 8 application for free. My Channel: @gearupwindows Chapters 00:00 Introduction of Ashampoo Photo Optimizer 8 04:35 Free License for Ashampoo Photo Optimizer 8 #giveaway #software #giveaways #gearupwindows
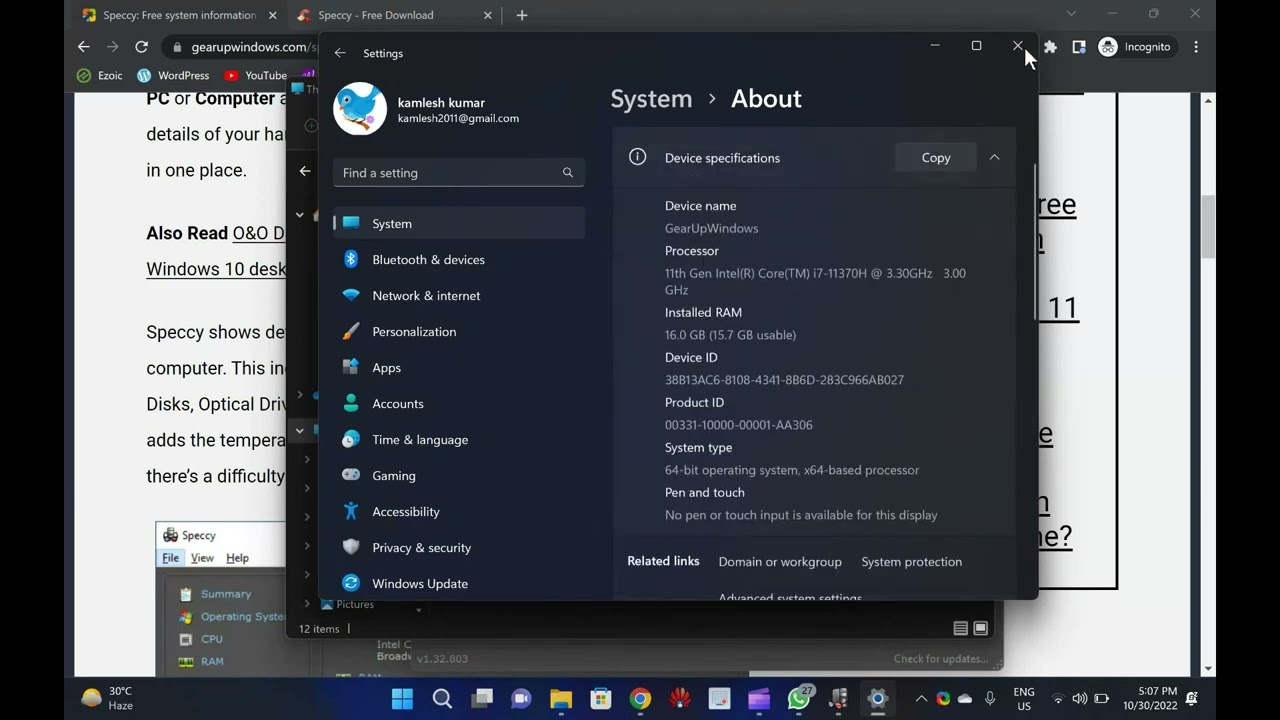
Download Speccy: A Free system information software for Wind...
2K views · Oct 30, 2022 gearupwindows.com
Welcome to gearupwindows youtube channel. In this video, you will learn about Speccy: A Free system information software for Windows 11/10/8/7. If you have purchased a new computer or laptop or someone asks you for your system configuration, you might be not answering perfectly. To know the full details of your computer hardware, Speccy is a cool freeware that lets you find out every component of your computer hardware. Basically, Speccy is a System Information tool that lets you know all the specs you may need to know about your Windows PC. While most of the important information you can see by right-clicking This PC or Computer and selecting the Properties option, you can even find the details of your hardware using Device Manager. Still, Speccy lays it down all in one place. Speccy shows detailed statistics on every piece of hardware in your computer. This includes CPU, Motherboard, RAM, Graphics Cards, Hard Disks, Optical Drives, Audio support, and much more. Additionally, Speccy adds the temperatures of your different components, so you can easily see if there’s a difficulty with any hardware of your PC. Speccy for Windows 11/10/8/7 Once you download and install the Speccy and run it to see the details of your computer, you can see the summary of the main hardware components. It will show the Operating System, CPU, RAM, Motherboard, Graphics, Storage, Optical Drives, and Audio details. In every entry, you can see the make and model of the hardware, along with the temperature of the CPU, Motherboard, and Storage device. Clicking on any left-side menu will show in detail about that component. Speccy is a convenient tool in case you want to troubleshoot any hardware or component of your computer. It is also helpful to manually install the drivers to find the make and model of the installed hardware. Once you find out the manufacturer details and model of the hardware, visit the manufacturer’s website and download the appropriate drivers for your hardware. This freeware is compatible with Windows 11, 10, 8.1, 7, Vista, and XP. Including both 32-bit and 64-bit versions, but not RT tablet editions are not supported yet. Download Speccy You can download the latest version of Speccy here (https://www.ccleaner.com/speccy/download). Chapters 00:00 Introduction about Speccy 02:23 Download Speccy #windows #windows11 #free #software #freeware #software
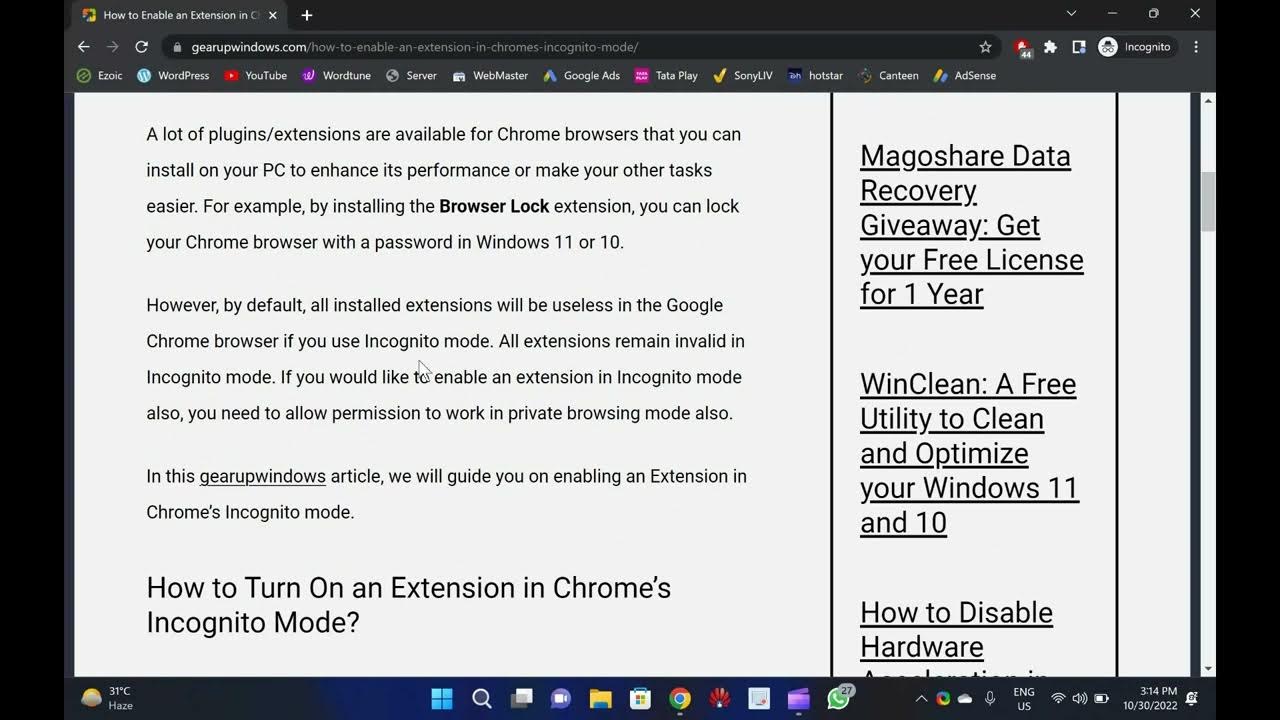
How to Enable an Extension in Chrome’s Incognito Mode
92 views · Oct 30, 2022 gearupwindows.com
Welcome to gearupwindows youtube channel. In this video, you will learn How to Enable an Extension in Chrome’s Incognito Mode. Google Chrome is one of the best browsers that is used worldwide. Like other popular browsers, it also offers Incognito mode that lets you browse the internet without leaving traces on your computer. A lot of plugins/extensions are available for Chrome browsers that you can install on your PC to enhance its performance or make your other tasks easier. For example, by installing the Browser Lock extension, you can lock your Chrome browser with a password in Windows 11 or 10. However, by default, all installed extensions will be useless in the Google Chrome browser if you use Incognito mode. All extensions remain invalid in Incognito mode. If you would like to enable an extension in Incognito mode also, you need to allow permission to work in private browsing mode also. How to Turn On an Extension in Chrome’s Incognito Mode? Follow these steps to enable an Extension in Chrome’s Incognito mode in Windows 11 or 10:- Step 1. First, open the Chrome browser on your computer. Step 2. Then, click on the Customize and control Google Chrome button. Step 3. Next, select the More tools, then Extensions option in the drop-down menu. Step 4. When the Extensions page opens, click on the Details button of a plugin you want to allow in Incognito mode. Step 5. Finally, turn On the toggle switch Allow in Incognito. Once you complete the above steps, the selected plugin will load in Incognito and normal Chrome modes. Chapters 00:00 Introduction 01:00 How to Turn On an Extension in Chrome’s Incognito Mode? #windows #windows11 #howto #tutorial #tutorials

Download 25 Best Mouse Cursors or Pointers for Windows 11 or...
13K views · Oct 30, 2022 gearupwindows.com
Welcome to gearupwindows youtube channel. In this video, we will provide you details and links to download 25 Best Mouse Cursors or Pointers for Windows 11 or 10. It is human nature to get bored with the same things after using them for a long time. Changing your mouse cursors is a good idea if you have been using a Windows computer for quite some time. The best way to make your desktop look unique is to use mouse cursors. The process is straightforward, just download, install, and start using a new mouse cursor theme. There are many beautiful cursors available on the internet. This post will share some of the best cursors available online. These cursors are compatible with all recent Windows operating systems, including Windows 11, 10, 8.1, and 7. In order to install any package, unzip (https://gearupwindows.com/how-to-open-an-iso-file-using-winrar/) it in a folder, right-click on the .inf file, and select Install. The changes are immediately applied to your Windows system. Changing the mouse pointers’ schemes (https://gearupwindows.com/how-to-change-mouse-pointer-in-windows-10/) on your Windows 11/10 PC is easy if you’ve installed some mouse pointers schemes. Numix Cursors Numix is a set of customized mouse cursors for Windows PCs. Its pointers are smooth and elegant and look completely professional. This package includes both dark and light versions of the cursors. Install the package by running the install.inf file. Download Numix Cursors (https://www.deviantart.com/alexgal23/art/Numix-Cursors-631491782) Polar Cursors Download Polar (https://www.deviantart.com/) Oxygen Cursors Download Oxygen Cursors (https://www.deviantart.com/lavalon/art/Oxygen-Cursors-76614092) Android Material Cursors (Blue) Download Android Material Cursors (Blue) (https://www.deviantart.com/mj-lim/art/Android-Material-Cursors-Blue-606792782) GTCC Cursors Download GTCC Cursors (https://www.deviantart.com/tchiro/art/Gtcc-cursor-for-Windows-378572922) El Capitan Cursors for Windows Download El Capitan Cursors for Windows (https://www.deviantart.com/in-dolly/art/Updated-ElCapitan-cursors-593804414) Metro X Cursor Set Download Metro X Cursor Set (https://www.deviantart.com/exsess/art/Metro-X1-Animated-Cursors-Set-215951016) Gaia 10 Cursors Download Gaia 10 Cursors (https://www.deviantart.com/djdavid98/art/Gaia10-Cursors-are-FINALIZED-2-193669321) Gant Cursor Pack Download Gant Cursor Pack (https://www.deviantart.com/pkuwyc/art/GANT-Cursors-Pack-M-28188770) Direction Download Direction Cursors (https://www.deviantart.com/jacksmafia/art/Direction-162993633) Mario Gant Cursors Download Mario Gant Cursors (https://www.deviantart.com/behelit/art/Mario-Gant-32008915) UNDERSized Cursors Download UNDERSized Cursors (https://www.deviantart.com/anemovatis/art/UNDERSized-12543232) Rainbow Cursors Download Rainbow Cursors (https://www.deviantart.com/pkuwyc/art/Rainbow-Cursors-32642224) Metro X3 Cursor Set Download Metro X3 Cursor Set (https://www.deviantart.com/exsess/art/Metro-X3-Cursors-Update-Two-411020859) Mickey Mouse Download Mickey Mouse Cursors (https://www.deviantart.com/maytekr/art/Mickey-Mouse-cursor-set-by-MayteKr-312623760) macOS Sierra Retina cursors Download here (https://www.deviantart.com/in-dolly/art/macOS-Sierra-Retina-cursors-650823654) Capitaine cursors Download (https://www.deviantart.com/krourke/art/Capitaine-cursors-624189658) Cursor Manager Download (https://sourceforge.net/projects/cursormanager/) WoW Cursors Download (https://www.deviantart.com/zanowin/art/WoW-Cursors-28331812) Star Wars Reloaded Download https://www.deviantart.com/claudiux88/art/Star-Wars-Reloaded-207895702 Chrome Glass Download https://www.deviantart.com/yoyos/art/Chrome-Glass-32252748 Gaia10 Cursors Download https://www.deviantart.com/novoo/art/Gaia10-Cursors-179116033 Portal Themed Cursor Set Download https://www.deviantart.com/maki-tak/art/Portal-Themed-Cursor-Set-276729703 EVO Custom Cursors Download https://www.deviantart.com/sk-studios-design/art/EvolutionOS-Custom-Cursors-for-Windows-648438877 Wii Cursors Download https://www.deviantart.com/allewun/art/Wii-Cursors-49355744 Chapters 00:00 Introduction 01:10 Numix Cursors 01:31 Polar Cursors 01:52 Oxygen Cursors 02:-09 Android Material Cursors (Blue) 02:27 GTCC Cursors 02:48 El Capitan Cursors for Windows 03:08 Metro X Cursor Set 03:21 Gaia 10 Cursors 03:31 Gant Cursor Pack 03:50 Direction 04:00 Mario Gant Cursors 04:19 UNDERSized Cursors 04:35 Rainbow Cursors 04:53 Metro X3 Cursor Set 05:05 Mickey Mouse 05:15 macOS Sierra Retina cursors 05:29 Capitaine cursors 05:53 Cursor Manager 06:36 WoW Cursors 07:04 Star Wars Reloaded 07:19 Chrome Glass 07:57 Gaia10 Cursors 08:20 Portal Themed Cursor Set 08:36 EVO Custom Cursors 08:53 Wii Cursors #windows #windows11 #mouse #pointers #cursor #cursors #windows10
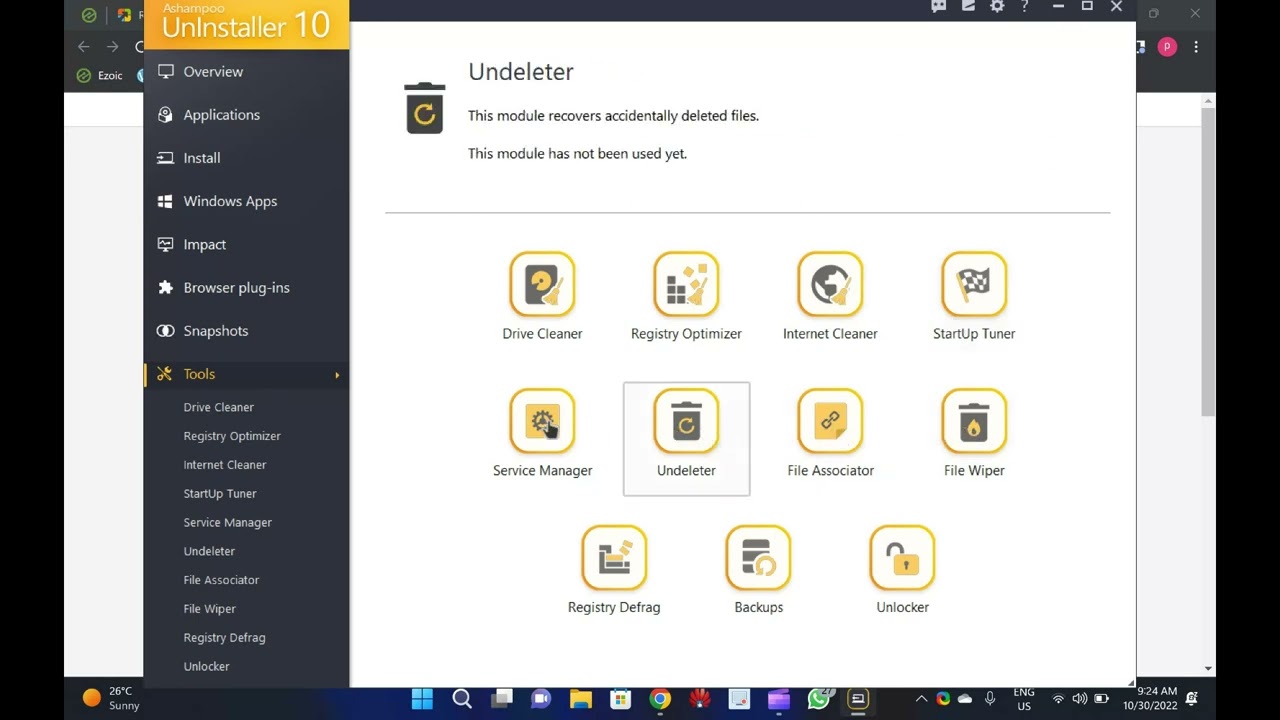
Ashampoo Uninstaller 10 Giveaway : Grab your Free License
7K views · Oct 30, 2022 gearupwindows.com
Ashampoo Uninstaller 10 Giveaway : Grab your Free License @gearupwindows
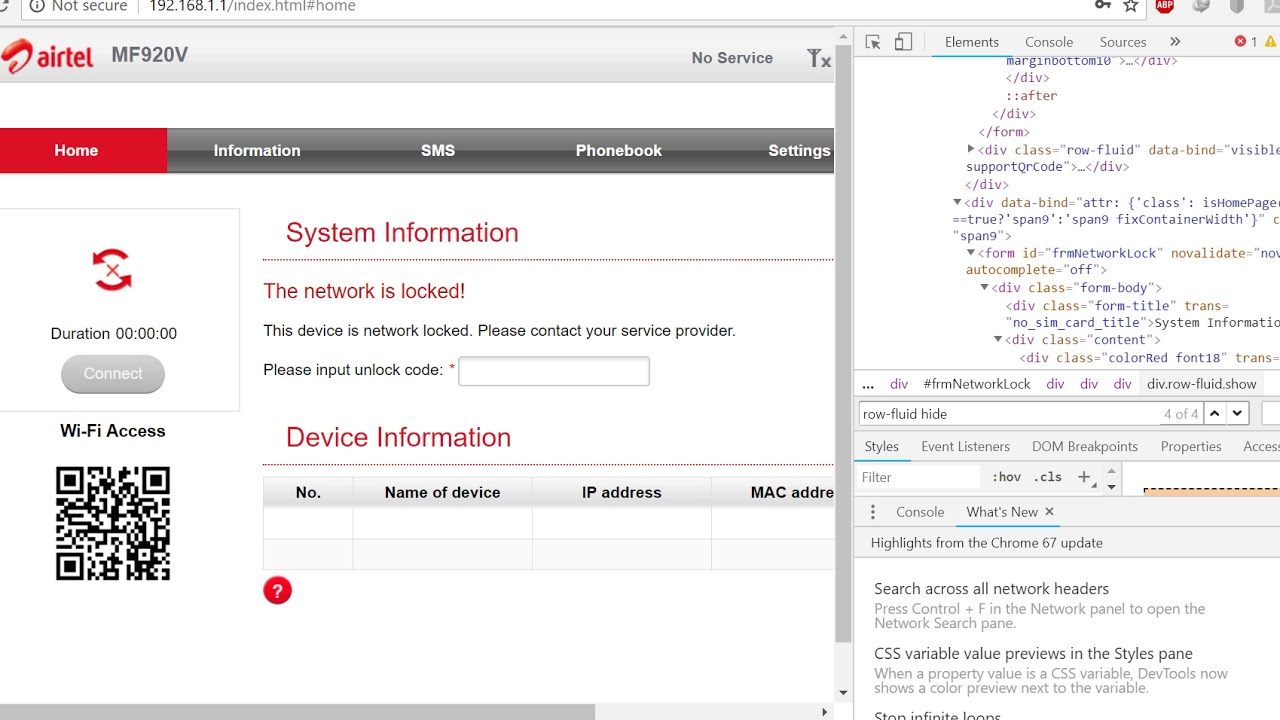
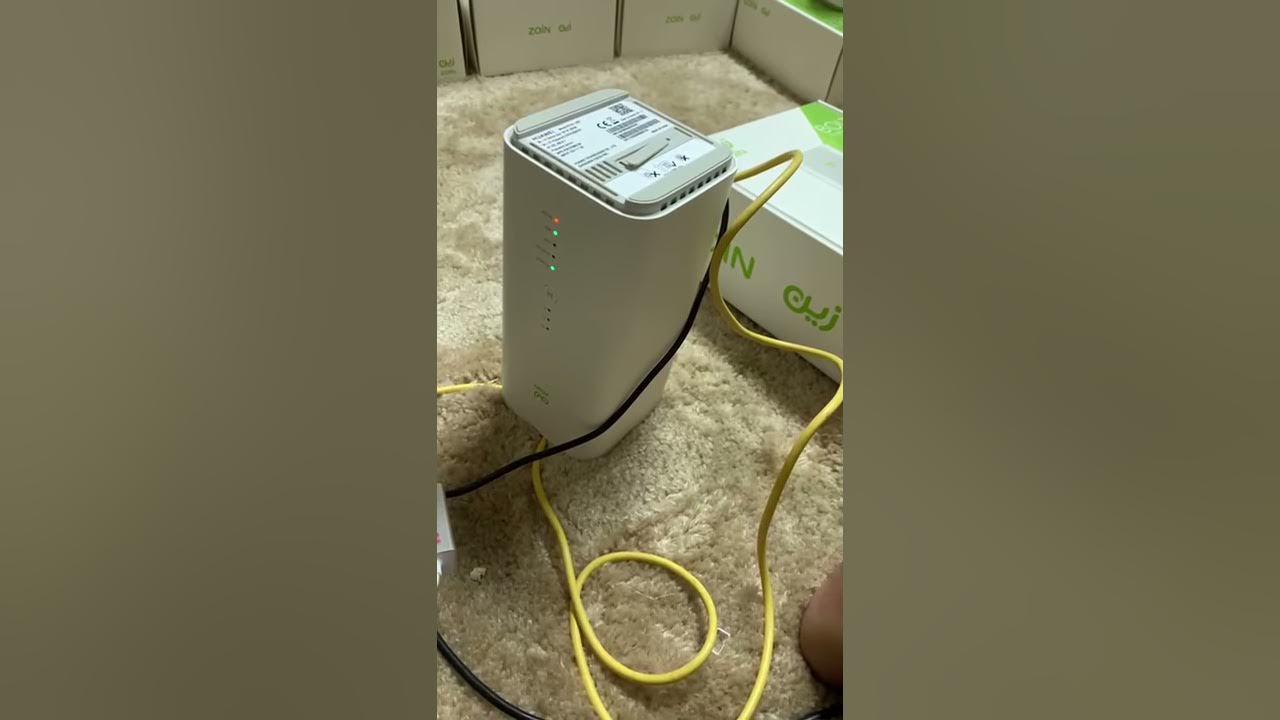
Airtel ZTE MF920V Unlock
14K views · Oct 27, 2022 routerunlock.com
Unlocking of Airtel ZTE MF920V Router by Routerunlock.com
How to Access the Power User or WinX Menu on Windows 11 or 1...
294 views · Oct 27, 2022 gearupwindows.com
How to Access the Power User or WinX Menu on Windows 11 or 10 @GearUpWindows The Windows 11 and 10 operating systems offer a wide range of features and keyboard shortcuts that make your workflow very easy. Using the keyboard shortcut Ctrl+Alt+Delete, you can quickly access the Task Manager, or you can access it by pressing Ctrl+Shift+Esc. The Power User Menu (WinX Menu), however, is not well known among Windows 11 and 10 users. With the Power User Menu, you can access several utilities, helpful locations, and useful options quickly. This allows easy access to the most frequently used features in the Windows operating system. This is extremely useful, but it’s hidden on the desktop. Chapters 00:00 Introduction 01:21 How to Open the Power User Menu with a Keyboard Shortcut? 01:40 How to Access the Power User Menu using the Mouse? 02:00 The Power User Menu in Windows 11 includes what? 05:24 What is included in Windows 10’s Power User Menu? #windows #windows11 #windows10 #howto #tutorial #tutorials

Download Magoshare Data Recovery with 1 Year Free License
571 views · Oct 28, 2022 gearupwindows.com
Magoshare Data Recovery Giveaway: Get your Free License for 1 Year @GearUpWindows Magoshare Data Recovery software is one of the best tools to recover your data from your PC in case you have permanently deleted the file or folder or formatted your partition unknowingly. When you purchase this application from the developer website, you’ll need to invest $69.95 for one year license, which will be valid for 2 Windows PCs. However, as a part of this giveaway, you will get a free license which you can activate on all your computers. Free License of Magoshare Data Recovery To activate the Magoshare Data Recovery, just download this application from the developer webpage (https://www.magoshare.com/data-recovery-software/windows-data-recovery-software.html) and install it on your computer as regular software. On the application interface, click the “key” icon and enter the following license code:- ZJXAX-FQ5E7-MZP1N-LQ4LN-JLR67 Finally, click the “Activate” button and you have done it. Chapters 00:00 Introduction 03:21 Free License of Magoshare Data Recovery #software #windows #windows11 #windows10 #giveaway #giveaways #free
How to Restart Graphics or Video Drivers in Windows 11 or 10
51 views · Oct 29, 2022 gearupwindows.com
How to Restart Graphics or Video Drivers in Windows 11 or 10? What is a keyboard shortcut to Restart Graphics or Video Drivers in Windows 11 or 10 @GearUpWindows Chapters 00:00 Introduction 01:08 How to Restart Graphics or Video Drivers in Windows 11 or 10? #windows #windows11 #windows 10 #tutorial #tutorials #graphicsdesign
Download Snappy Driver Installer to Install and Update Drive...
6K views · Oct 29, 2022 gearupwindows.com
Download Snappy Driver Installer to Install and Update Drivers on Windows 11, 10, 8 and 7 @gearupwindows Download Snappy driver installer from https://sdi-tool.org/ Chapters 00:00 Introduction of Snappy Driver Installer 03:50 Download Snappy Driver Installer for Windows 10/11 #windows #windows11 #windows 10 #free #freeware #software
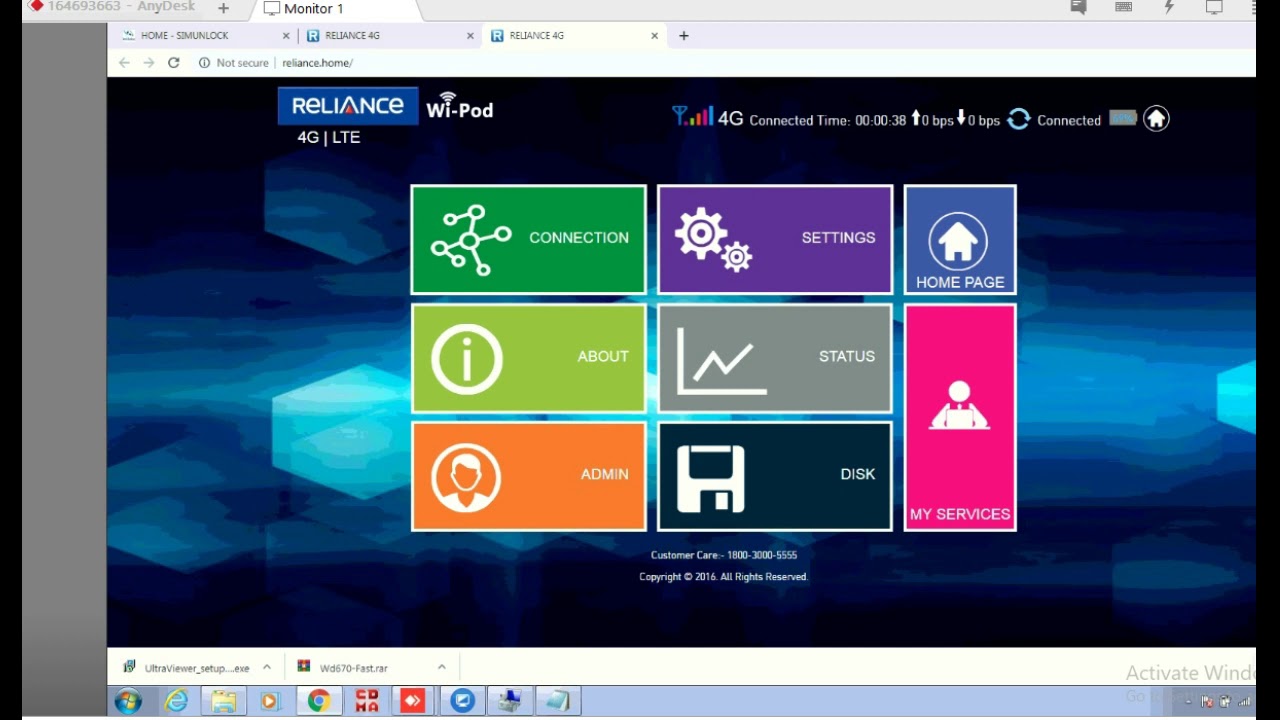
How to unlock Reliance WD670?
10K views · Oct 27, 2022 routerunlock.com
Unlocking of Reliance WD670 Wi-POD. How to Unlock Reliance WD670. Reliance WD670 Unlocking by firmware.
Introduction about RouterUnlock.com
24K views · Oct 27, 2022 routerunlock.com
This video is about short overview of routerunlock.com.
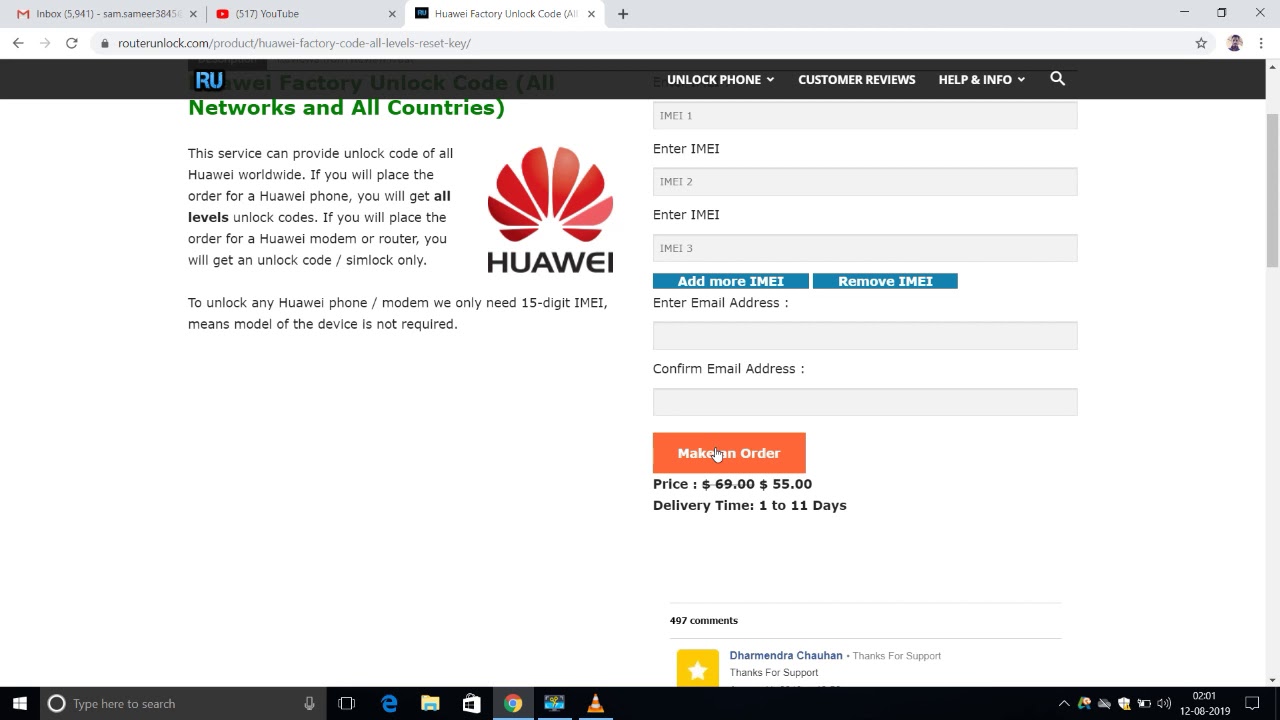
How to Unlock Huawei E5788 - RouterUnlock.com
132K views · Oct 27, 2022 routerunlock.com
Unlocking and unlock code of Huawei E5788 WiFi MiFi router. How to unlock Huawei e5788 router? Zain Kuwait Huawei E5788 unlocked successfully. - routerunlock.com
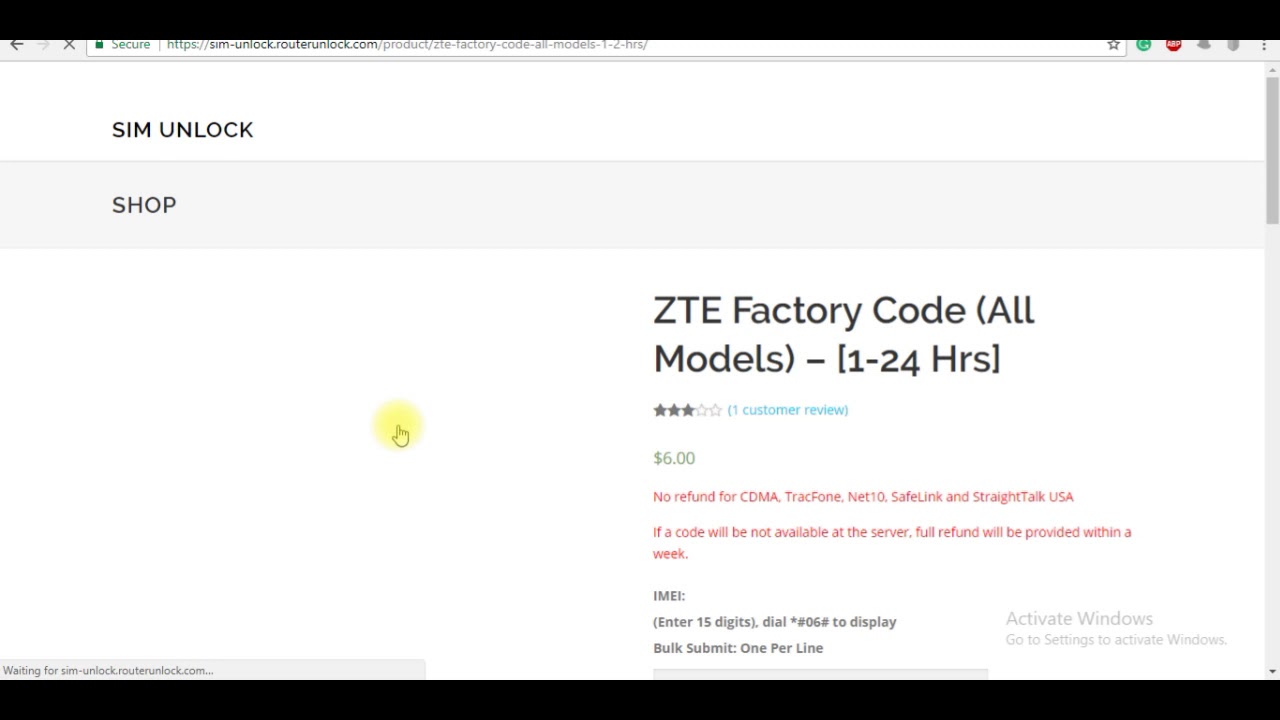
Unlocking of ZTE MF90(+) Plus Router
87K views · Oct 27, 2022 routerunlock.com
How to Unlock ZTE MF90+ WiFi MiF Router - RouterUnlock.com

How to Unlock LG Phoenix 3 LG M-150 Phone?
5K views · Oct 27, 2022 routerunlock.com
How to Unlock LG Phoenix 3 LG M-150 Phone? Unlocking video of LG Phoenix 3 Phone. How to enter unlock code in LG Phoenix 3 phone? How to enter the code in LG M-150 phone?
How to Disable Hardware Acceleration in Google Chrome
5K views · Oct 26, 2022 gearupwindows.com
How to Disable Hardware Acceleration in Google Chrome @GearUpWindows Google Chrome is the most popular browser worldwide and has several features, including hardware acceleration. This takes advantage of your computer’s GPU (graphics hardware) to speed up processes and free vital CPU time. This improves the overall user experience while surfing the internet. However, depending on your device configuration, the hardware acceleration feature of Chrome may negatively affect your experience by preventing visual elements from displaying correctly on the screen. If you are experiencing issues, such as missing menus or dialog boxes, we recommend you disable the hardware acceleration feature and see if this helps you. Chapters 00:00 Introduction 01:13 How to Turn On/Off Hardware Acceleration in Chrome? 02:12 How to Enable or Disable Hardware Acceleration in Chrome using Registry Editor? #windows #windows11 #windows10 #chrome #googlechrome #chromesetting #chromesettings #registry
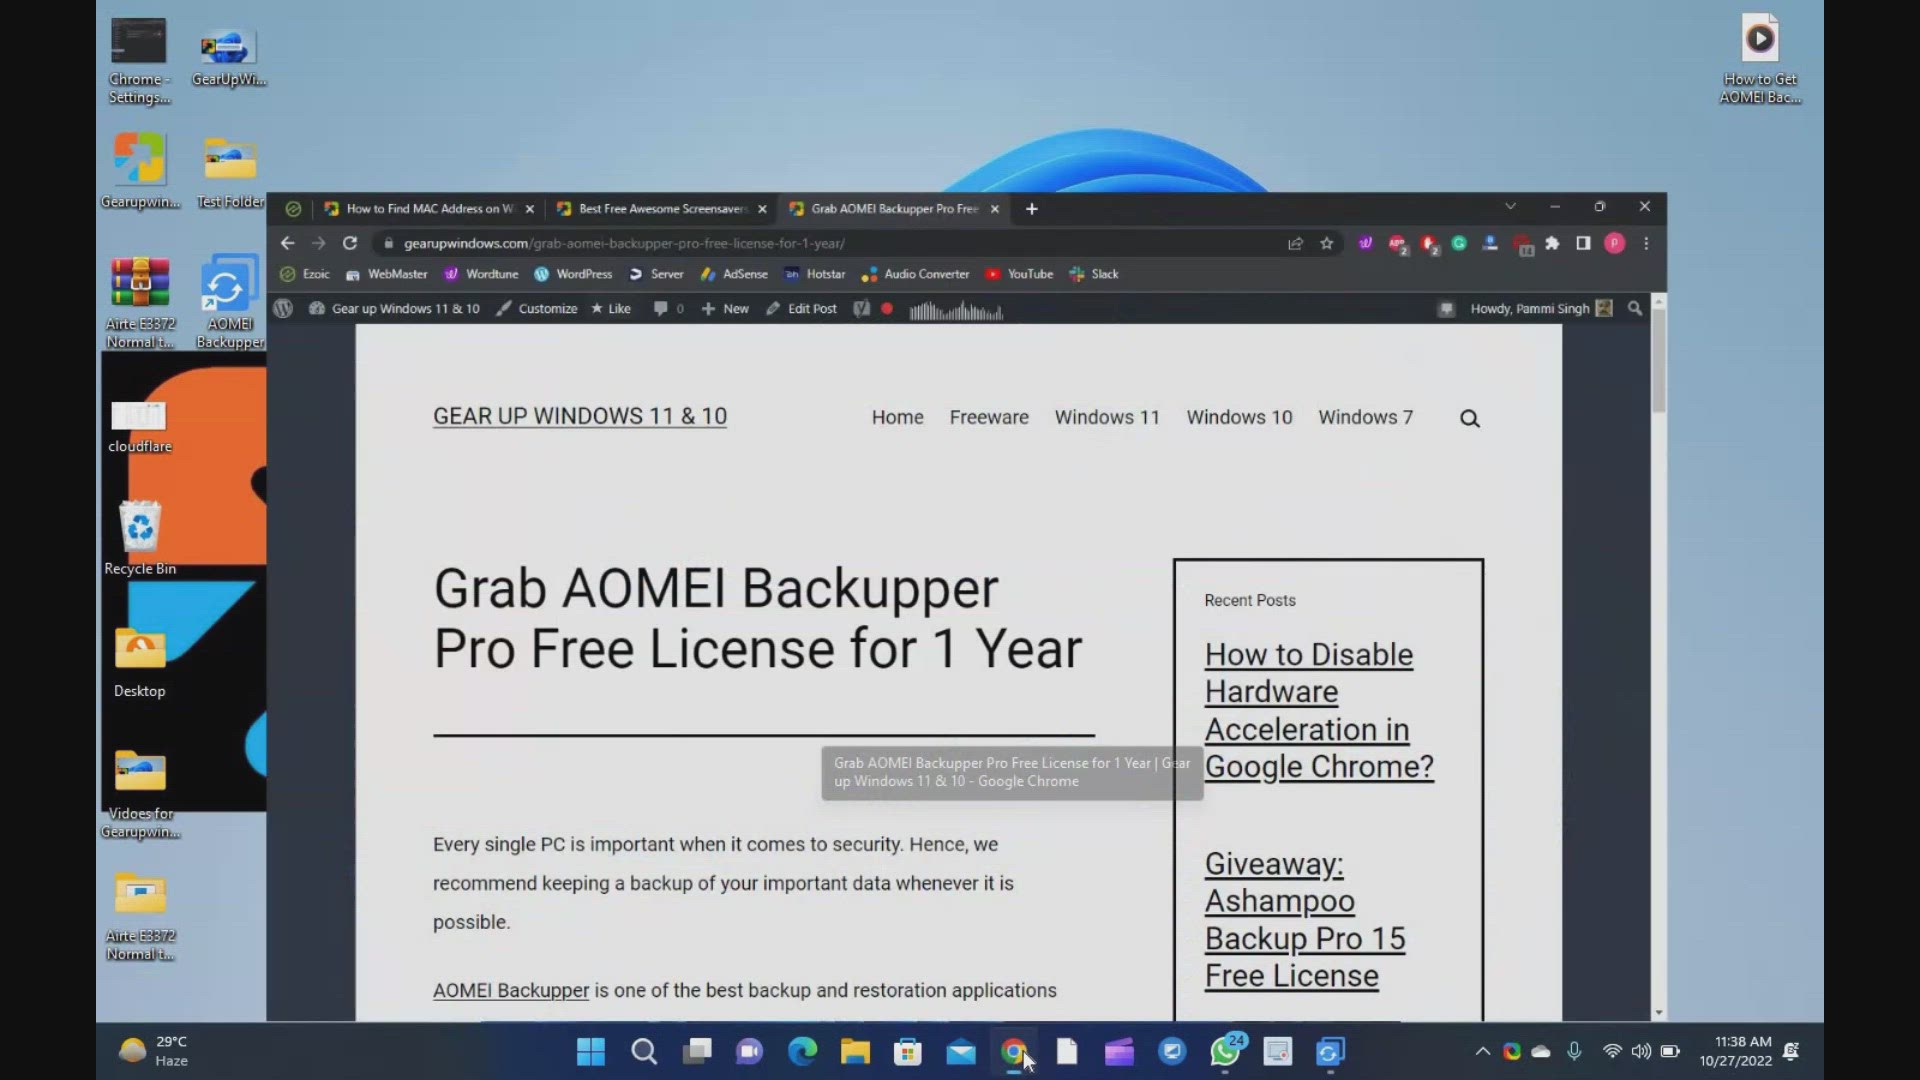
How to Get AOMEI Backupper Pro License for Free
2K views · Oct 27, 2022 gearupwindows.com
AOMEI Backupper is one of the best backup and restoration applications available over the internet for a Windows PC. It has a simple and elegant interface. The app works well on Windows 11, 10, 8.1, 8, and 7 (both editions, 32-bit & 64-bit) @GearUpWindows Free License of AOMEI Backupper Pro AOMEI Backupper Pro is one of the most advanced and best backup software that enables you to create a copy of your system that you can restore in the event of significant problems. Although the Pro version of this application is paid, you can grab it for free for one-year usage. To activate the AOMEI Backupper Pro 7, navigate to the official website and download a trial copy (https://www.ubackup.com/professional.html) of this application. Then, install it on your PC as normal software. Now, run the application and enter one of the following giveaway keys to activate Pro features:- AMAB-2PRMX-RY1II-G7FTP AMAB-WQZ4C-JUE7Y-2MPTC AMAB-3SUYQ-UV4PP-R1T3Z Update: New license keys: AMPR-S67QV-H5621-1Q55U AMAB-WQZ4C-JUE7Y-2MPTC Chapters 00:00 Introduction 02:25 Download and Free License of AOMEI Backupper Pro #windows #windows11 #free #windows10 #giveaway #giveaways
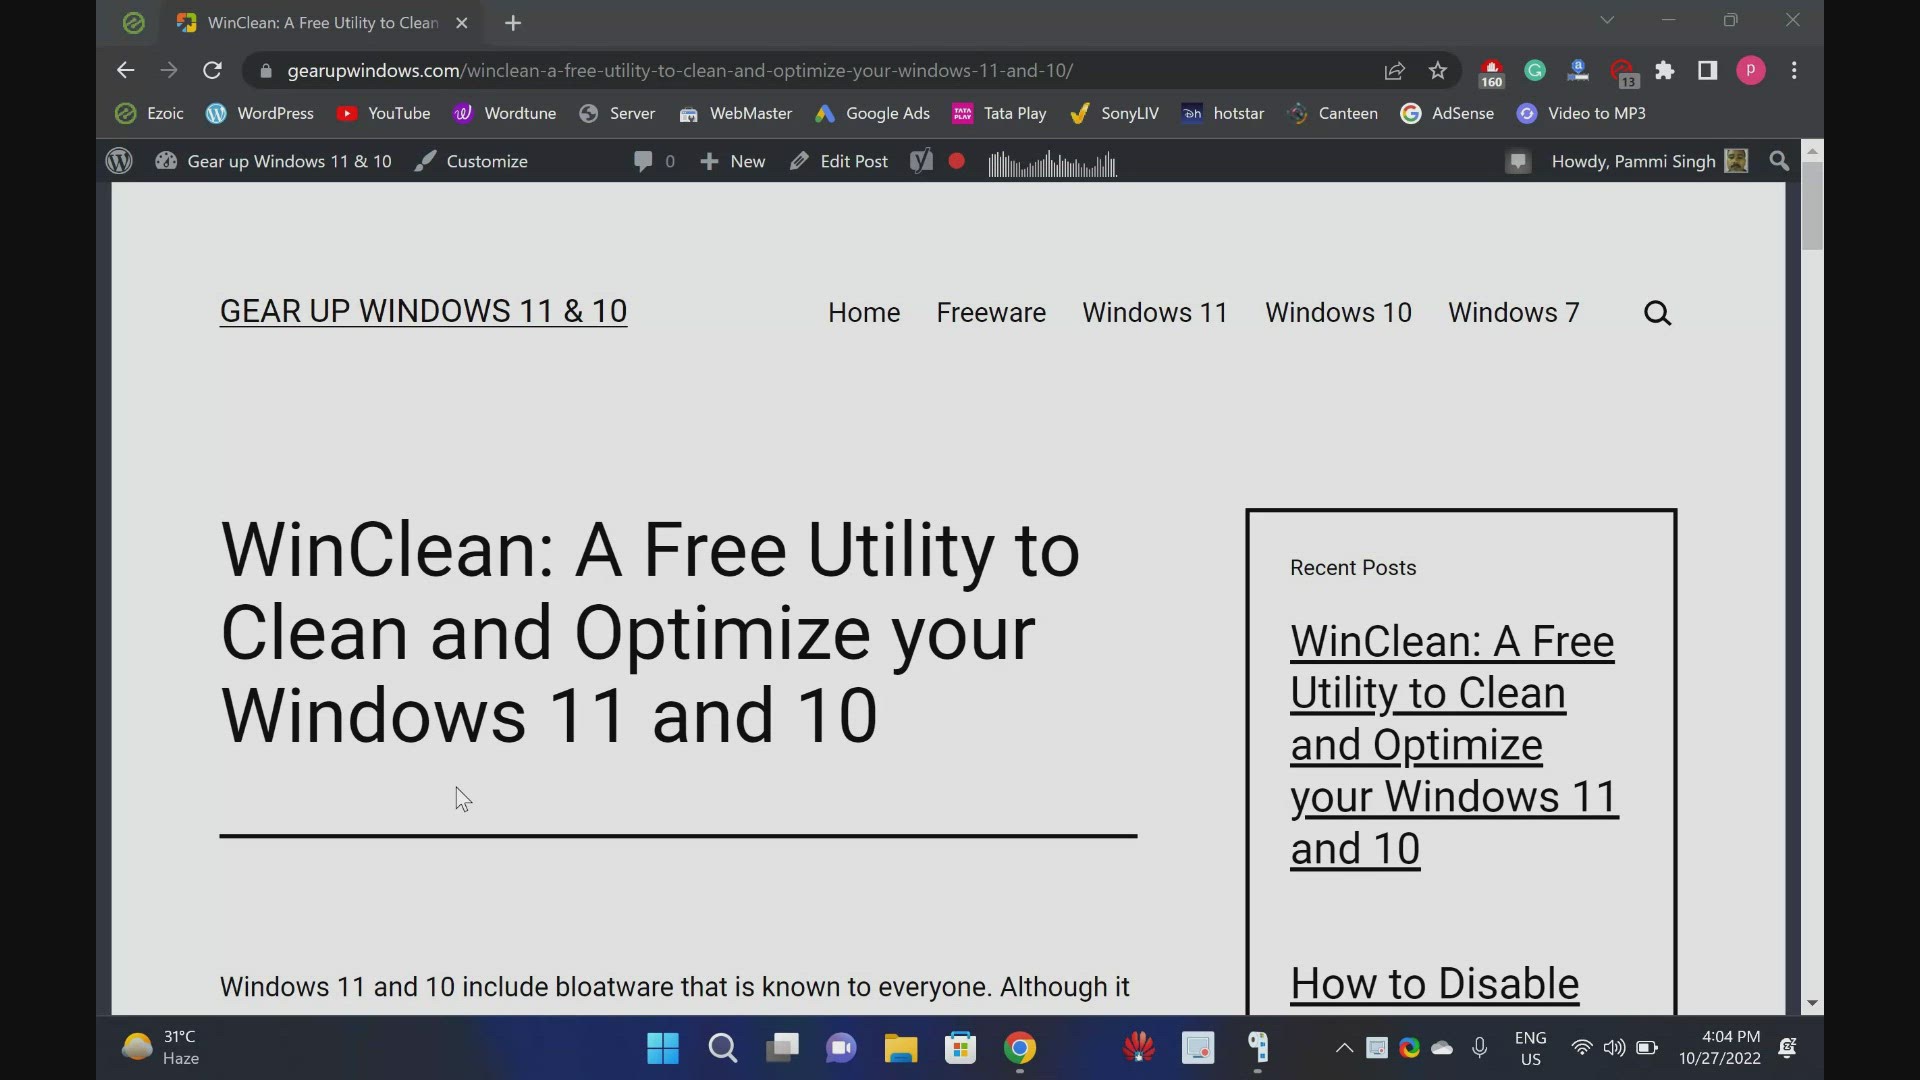
Download WinClean: A Free Utility to Clean and Optimize your...
341 views · Oct 27, 2022 gearupwindows.com
Download WinClean : A Free Utility to Clean and Optimize your Windows 11 and 10 @GearUpWindows Windows 11 and 10 include bloatware that is known to everyone. Although it is possible to manually remove or disable unrequired things and enhance the overall performance of Windows, it is time-consuming, and you can’t turn it off manually completely. Hence, you need a third-party such as WinClean. Download WinClean If you want to try WinClean on your PC, you can download here (https://github.com/5cover/WinClean/releases). Chapters 00:00 Introduction 05:01 Download WinClean Free #freeware #windows #windows11 #windows10 #free #software
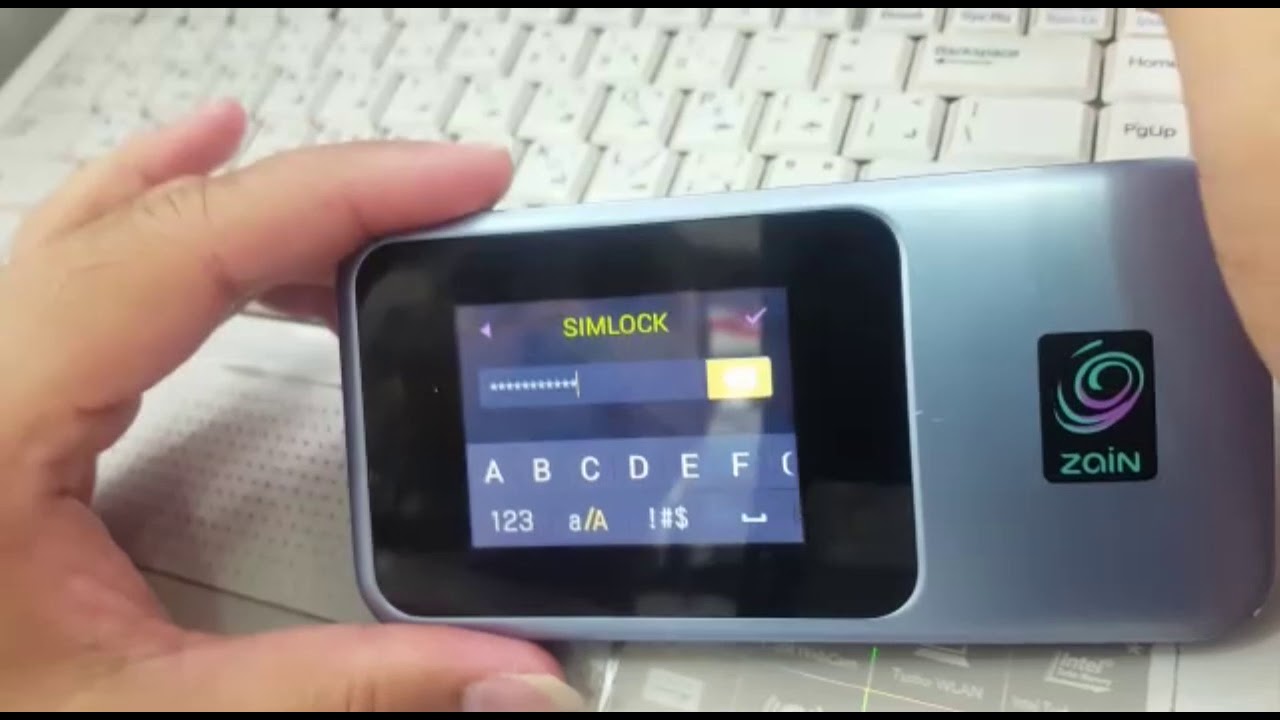
Unlocking of Viva Kuwait Huawei E5577 Router
31K views · Oct 27, 2022 routerunlock.com
Unlocking of Viva Kuwait Huawei E5577 Router. It is tested with all Viva Huawei E5577Cs-321 firmware versions 21.200.07.00.397 , 21.200.07.01.397, 21.329.63.00.397 , and 21.328.62.01.397. You can get text version of unlocking at https://routerunlock.com/free-unlocking-of-viva-kuwait-huawei-e5577cs-321-firmware-21-329-63-00-397/
Unlock Huawei Zain B716-263 Router
15K views · Oct 27, 2022 routerunlock.com
This guide is about unlocking of Zain Saudi Arabia Huawei B716-263 Router. You can unlock any LAN port router with this method. For unlock code, you can place the order at routerunlock.com
9 Ways to Open Settings app in Windows 11
112 views · Oct 25, 2022 gearupwindows.com
Welcome to the gearupwindows youtube video channel (https://www.youtube.com/@gearupwindows). In this video, you will learn several ways to open the Settings app in Windows 11. The Settings app was introduced on Windows 8, and now it has improved a lot and is available on Windows 11, too. This gearupwindows article will guide you through different ways to access the Settings app in Windows 11. The Settings app is the most critical program in Windows 11/10. It allows controlling your software and hardware looks and behavior. The Settings app on Windows 11 has been completely redesigned when compared to Windows 10. It looks wonderful, and also it is straightforward to use. It includes a left navigation pane for categories, and on the right panel, it includes foldable sections with all the options to control your device. There are several ways available to access the Settings app on Windows 11. These are the following:- Using Keyboard Shortcut From Start Menu Through Windows Search Via Quick Settings Using Run command box Through Windows Terminal, PowerShell, or Command Prompt Using Desktop Context Menu Via File Explorer Through Taskbar Keyboard Shortcut This is the quickest and most straightforward way to access the Settings app on Windows 11. Press Windows + I keys on your keyboard simultaneously to open the Settings app. Alternatively, press Windows + X keys simultaneously from your keyboard to open the quick links menu and select Settings. Start Menu If you don’t prefer to use a keyboard shortcut, you can open Settings from the Start menu. Click on the Start button on the taskbar or press the Windows key from the keyboard. Now, click on the Settings gear icon. Windows Search Click on the Search button present on the taskbar or press Windows + S keys simultaneously to open the Windows Search panel. Type Settings in the search box. Click on Settings in the search result to open it. Quick Settings To launch the Settings app from the Quick Settings pane, press Windows + A keys from the keyboard or click on the quick settings area in the taskbar. In the Quick Settings pane, click on the Settings gear icon. Run command box Press Windows + R keys simultaneously to open the Run dialog box. Type ms-settings: in the Run box, and hit the Enter key from the keyboard to launch the Settings app. Windows Terminal, PowerShell, or Command Prompt Open PowerShell, Command Prompt, or Windows Terminal and type ms-settings:. Press Enter from the keyboard to open the Settings app. To open Windows Terminal, right-click on free space on the desktop and select the option Open in Windows Terminal. Using Desktop Context Menu From the desktop context menu, you can also open the Settings app. For that, perform right-click on an empty spot and then click the Personalize option to open the Settings and then the Personalization page. Via File Explorer Open File Explorer by pressing Windows + E keys simultaneously from the keyboard. In the File Explorer address bar, type ms-settings: and press the Enter key from the keyboard to open the Settings app on Windows 11. Through Taskbar Using this method, you can quickly access the Taskbar Settings page in Windows 11. Perform a right-click on the free space on Taskbar and select the Taskbar Settings option.
9 Ways to Open File Explorer in Windows 11
4K views · Oct 25, 2022 gearupwindows.com
How to Open File Explorer in Windows 11. 9 Was to open File Explorer in Windows 11 @GearUpWindows Like Windows 10, Windows 11 also comes with a built-in file manager application known as File Explorer. It is one of the most crucial apps in Windows 11 that enables you to open, move, copy, rename, or delete files, and a lot more. Using File Explorer, you can easily navigate and manage the drives, folders, and files on your computer. Chapters 00:00 Introduction 00:58 Using Taskbar shortcut 01:15 Using WinX Menu 01:55 Using Task Manager 02:49 Using Shortcut key 03:06 Using Start Menu 03:24 Using Command Prompt 03:45 Using PowerShell 04:13 Using Desktop Shortcut 04:58 Using Run box #windows #windows11 #windows10 #fileexplorer #howto #tutorial #tutorials
Turn your Windows 11 or 10 PC into a Flip Clock using Fliqlo
897 views · Oct 25, 2022 gearupwindows.com
Fliqlo ScreenSaver: Turn your Windows 11 and 10 PCs into a Flip Clock @GearUpWindows There are many high-quality screensavers included with the Windows operating system. However, Microsoft has not shown any interest in this since the launch of Windows 7. The existing screen savers that came with Windows 7 are still included in Windows 11/10. If you are still using screensavers to protect your PC, there’s good news for you. Download Fliqlo You can download the Fliqlo from its official website (https://fliqlo.com/screensaver/). Chapters 00:00 Introduction 01:49 How to Install Fliqlo Screensaver? 02:38 How to Use Fliqlo Screensaver on Windows 11/10? #flipclock #windows #windows11 #windows10 #free #freeware #screensaver

Duplicate Username at Login or Sign In screen in Windows 10
4K views · Oct 25, 2022 gearupwindows.com
Fix Duplicate Username at Login or Sign In screen in Windows 10 @GearUpWindows Does your Windows 10 sign-in screen show the same user account twice? Windows 10 comes with several new features and enhancement that was not available in its predecessors. For example, one of the known functionality of Windows 10 is “Automatically sign in.” Recently I enabled the auto-login feature on my PC and noticed that the same account is showing twice on the Login or Sign-in screen. There are two ways to fix the duplicate username at the Login or Sign-In screen in Windows 10. These are the following:- By changing Sign-In Options By disabling auto-login #windows #free #windows10 #howto
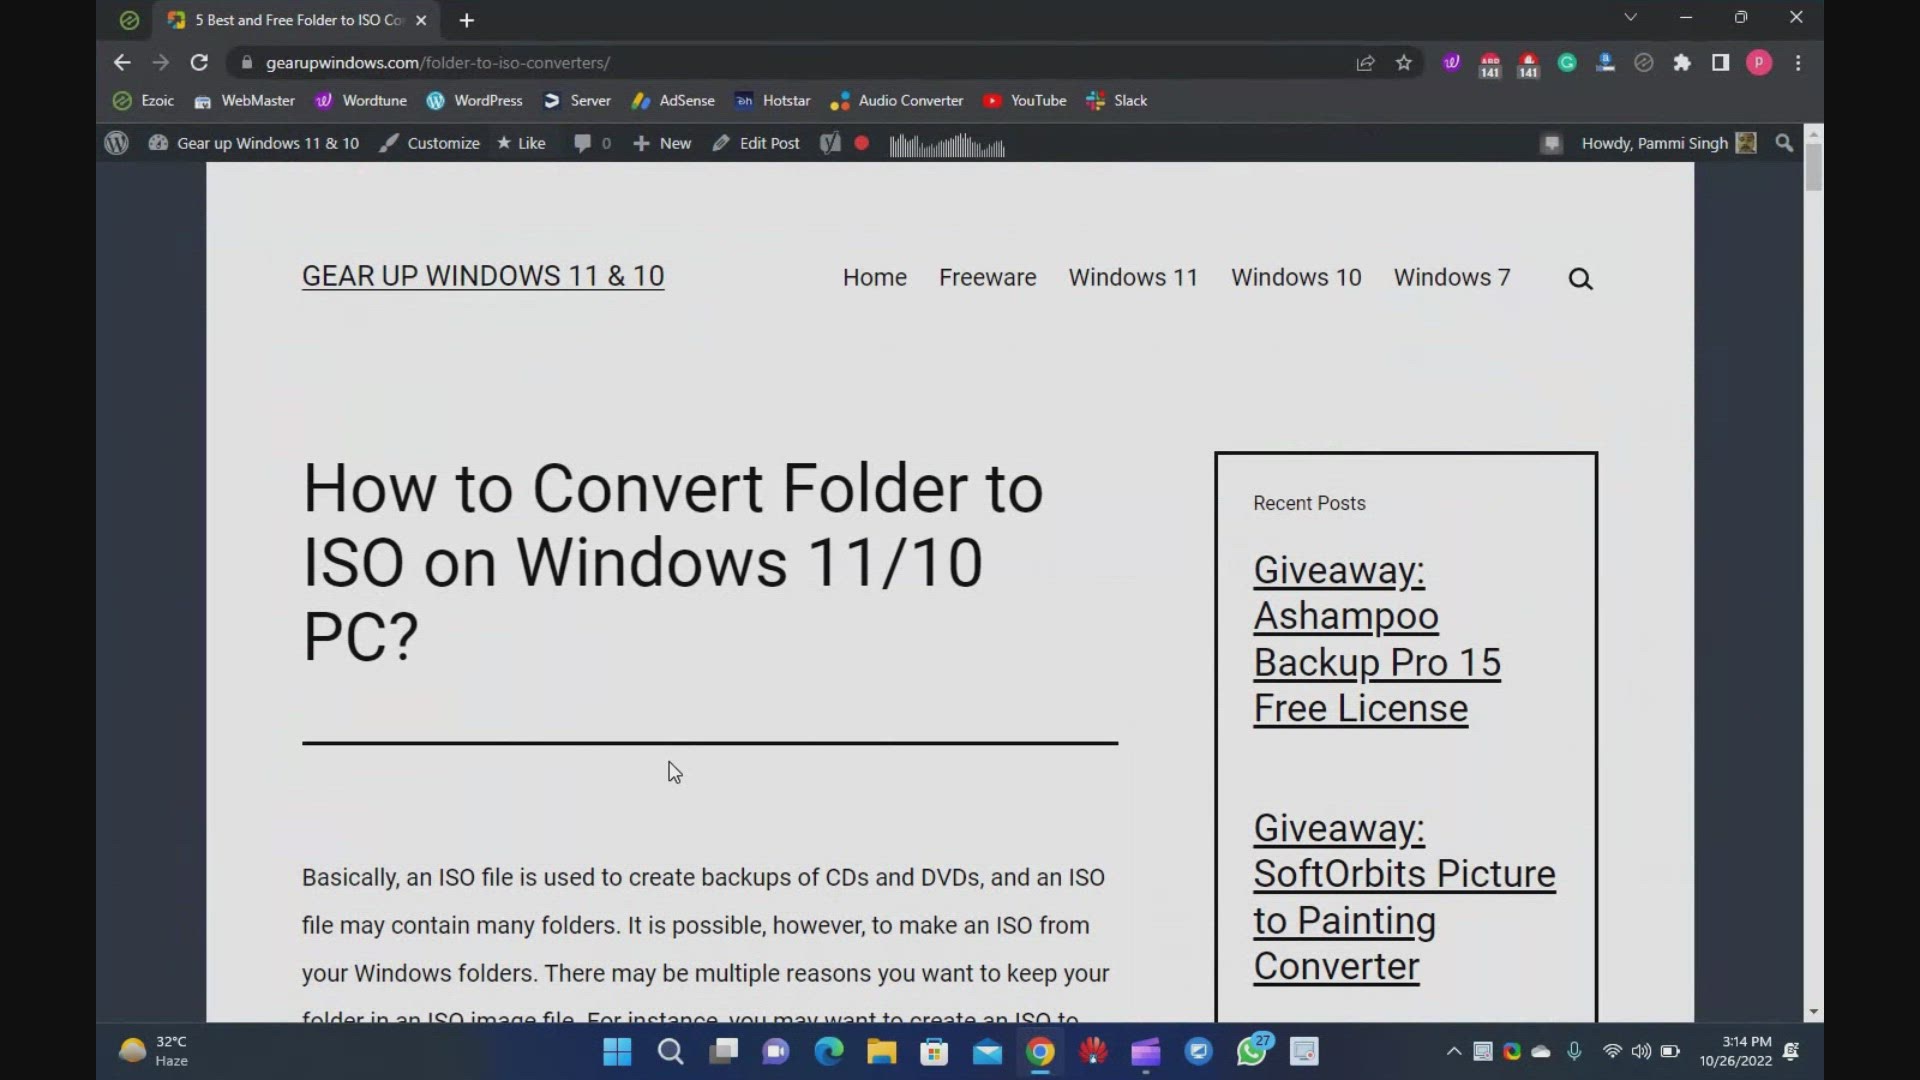
5 Best and Free Folder to ISO Converters for Windows 11 and ...
335 views · Oct 26, 2022 gearupwindows.com
5 Best and Free Folders to ISO Converters for Windows 11 and 10 @GearUpWindows Basically, an ISO file is used to create backups of CDs and DVDs, and an ISO file may contain many folders. It is possible, however, to make an ISO from your Windows folders. There may be multiple reasons you want to keep your folder in an ISO image file. For instance, you may want to create an ISO to keep all of your folders together. You may also want to keep certain folders on hand so you can burn them. Once you have created an ISO file, you can see the content by mounting them on a virtual CD-ROM. That means there is no need to extract ISO content again in a folder. There are many free applications available in the market that help you create an ISO from a folder. Some of the good freeware are the following:- Folder2iso WinCDEmu AnyBurn ImgBurn AnyToISO Download Folder2iso: https://www.trustfm.net/software/utilities/Folder2Iso.php Download WinCDEmu: https://wincdemu.sysprogs.org/download/ Download AnyBurn: http://www.anyburn.com/ Download ImgBurn: https://www.imgburn.com/ Download AnyToISO: https://www.crystalidea.com/download Chapters 00:00 Introduction 01:34 Folder2iso 02:55 WinCDEmu 04:19 AnyBurn 06:20 ImgBurn 07:37 AnyToISO #windows #windows11 #windows10 #iso #convert #download #free #freeware
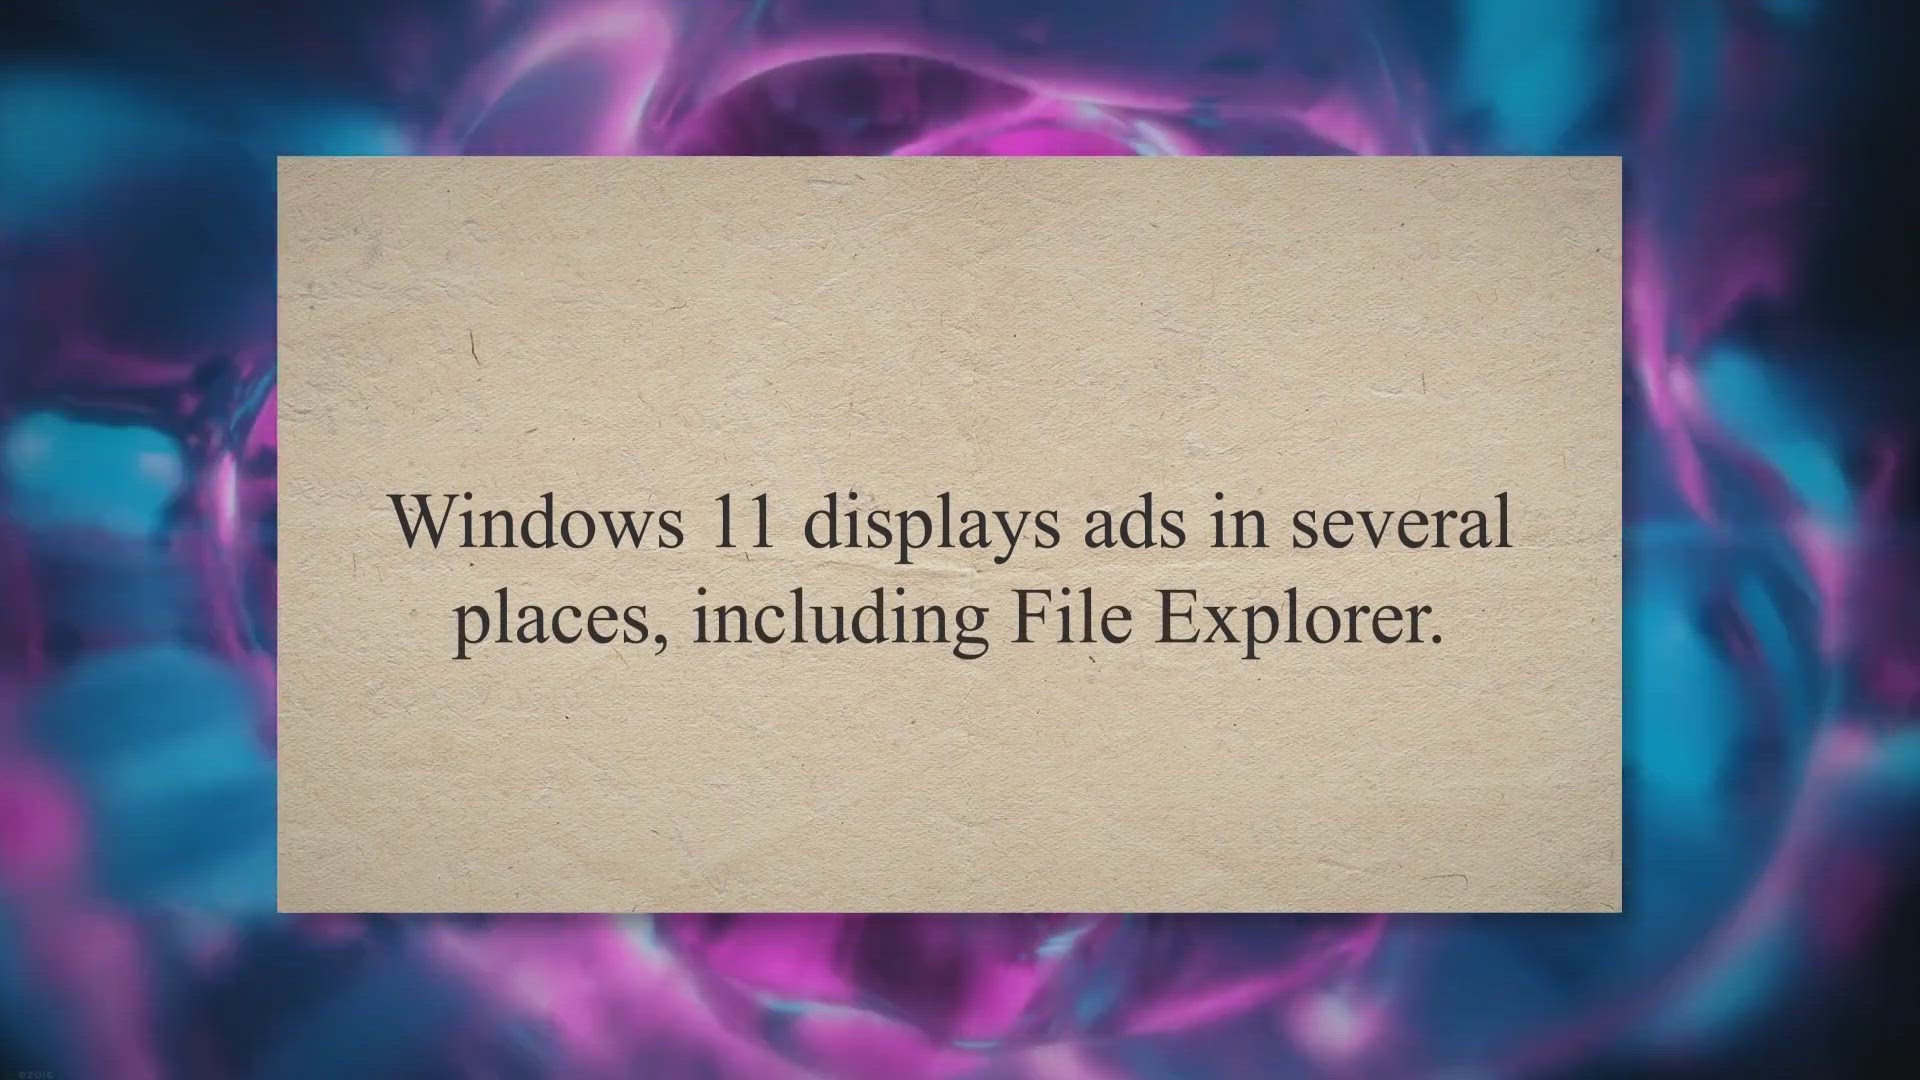
How to Disable Ads in Windows 11 File Explorer?
927 views · Oct 10, 2022 gearupwindows.com
How to Disable Ads in Windows 11 File Explorer? | Windows 11 displays ads in several places, including File Explorer. Sync provider notifications appear in File Explorer @gearupwindows

Get WinX HD Video Converter Deluxe Free License
2K views · Oct 10, 2022 gearupwindows.com
Get WinX HD Video Converter Deluxe Free License | WinX HD Video Converter Deluxe is a video converter tool, as its name implies @gearupwindows In order to grab a free license for WinX HD Video Converter Deluxe, visit its giveaway page (https://www.winxdvd.com/hd-video-converter-deluxe/camera-footage.htm) and input your email address. After that, click on the Get It Free button. Once done, you will receive an email with the license code and software download link. Just download the WinX HD Video Converter Deluxe application following the link in your email and activate it using the license code that you got in your email. Please note that the giveaway version of WinX HD Video Converter Deluxe doesn’t support YouTube downloading, and also you can not upgrade it. Also, remember to activate the application in 15 days, or it will be invalid automatically.

Fliqlo: Turns your Windows 11 or 10 PC into a Flip Clock
2K views · Oct 10, 2022 gearupwindows.com
Fliqlo: Turns your Windows 11 or 10 PC into a Flip Clock | There are many high-quality screensavers included with the Windows operating system @gearupwindows

How to stop Microsoft Office Word from displaying two pages ...
2K views · Oct 12, 2022 gearupwindows.com
How to stop Microsoft Office Word from displaying two pages next to each other? | If you are running the Microsoft Office Word program 2016 or 2019 on your Windows PC and noticed the Word program shows several pages of a document
How to resize or increase Bootcamp Partition without deletin...
624 views · Oct 13, 2022 gearupwindows.com
How to resize or increase Bootcamp Partition without deleting Windows? | You can install Windows 10 / 8.1 / 7 on a Mac machine with the help of an official Boot Camp Assistant provided by Apple itself. @gearupwindows
!['Video thumbnail for How to Unlock Airtel India Huawei E5573cs-609 Unlocking [Firmware 21.333.64.01.284]?'](https://streaming.humix.com/poster/MGeJDVBnwOJHUkEv/MGeJDVBnwOJHUkEv_j1667703725252-vmil7u_t1667703947.003.jpg)
How to Unlock Airtel India Huawei E5573cs-609 Unlocking [Fir...
63K views · Nov 6, 2022 sim-unlock.blog
Unlocking of Airtel India locked new 4G LTE router Huawei E5573cs-609 is supported. It can be unlocked without opening the screws. It comes with firmware version 21.333.64.01.284.
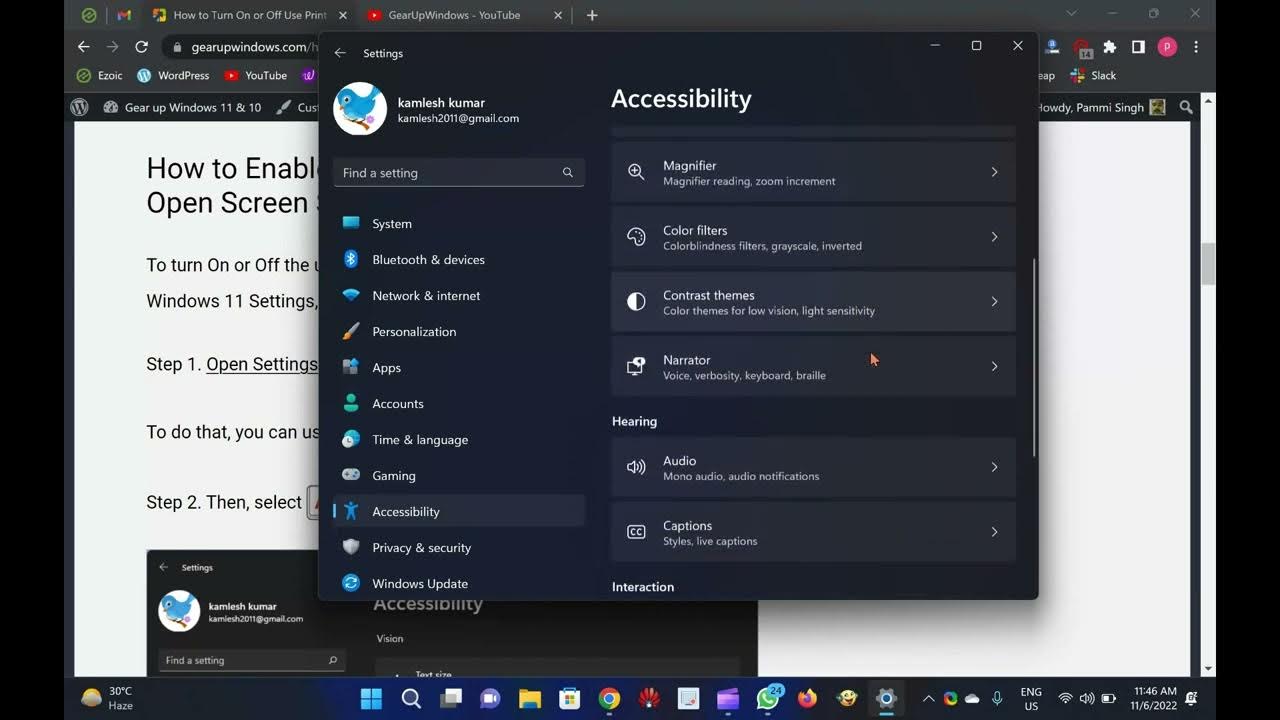
2 Ways to Enable or Disable Print Screen Key to Open Screen ...
11K views · Nov 6, 2022 gearupwindows.com
How to enable or disable Use Print Screen Key to Open Screen Snipping in Windows 11? It is common for PC users to take screenshots. In Windows 11, you may find a dedicated key for taking screenshots. You may find it labeled as Prscr, PrtScrn, Prt Scrn, or PrntScrn. With Windows 11, you can quickly capture and annotate screenshots and images using touch, pen, or mouse clicks using a built-in app called Snip & Sketch. This feature is called Screen snipping. Sometimes you may want to open the Screen Snipping feature by pressing the keyboard shortcut “Print Screen.” However, on Windows 11, the “Use the Print screen button to open screen snipping” is disabled by default. By default, screenshots are saved to the clipboard when you press the “b” key on the keyboard. Furthermore, you can paste the clipboard item into any compatible program, like Microsoft Word, Paint, etc. If you prefer, you can open screen snipping by pressing the dedicated Print Screen key. To do that, you need to enable the “Use the Print screen button to open screen snipping” feature on your PC. In this gearupwindows article, you will learn to enable or disable “Use the Print screen button to open screen snipping” on Windows 11. To do so, you can use either the built-in Settings app or Registry Editor. Here is how to do it. How to Enable or Disable Print Screen Key to Open Screen Snipping in Windows 11 Settings? To turn On or Off the use of Print Screen key to launch screen snipping in Windows 11 Settings, use these steps:- Step 1. Open Settings. To do that, you can use the Windows + I keyboard shortcut. Step 2. Then, select Accessibility on the left sidebar. Step 3. On the right sidebar, click on the Keyboard option. Step 4. On the following page, turn On or Off the “Use the Print screen button to open screen snipping” under the “On-screen keyboard, access keys, and Print screen” section. Step 5. To apply the changes, restart your computer. How to Turn On or Off Print Screen Key to Launch Screen Snipping in Windows 11 Registry Editor? To enable or disable the use of the Print Screen key to launch screen snipping in Windows 11 Settings, use these steps:- Step 1. Open Registry Editor. Step 2. In the left sidebar, select the following key:- HKEY_CURRENT_USER\Control Panel\Keyboard Step 3. Double-click PrintScreenKeyForSnippingEnabled REG_DWORD on the right sidebar to edit its value. Step 4. In the “Value data” field, enter the following:- 0 = To disable the Use Print screen key to open screen snipping. 1 = To enable the Use Print screen key to open screen snipping. Step 5. Next, click the OK button. Step 6. You will now have to reboot your computer to apply the changes. That's it. Please subscribe to @GearUpWindows channel to get more videos. Thanks. Chapters 00:00 Introduction 02:06 How to Enable or Disable Print Screen Key to Open Screen Snipping in Windows 11 Settings? 03:12 How to Turn On or Off Print Screen Key to Launch Screen Snipping in Windows 11 Registry Editor? #windows #windows11 #windows10 #howto #tutorial #tutorials
Download Huawei Latest Drivers for Modem and Router
150K views · Nov 9, 2022 routerunlock.com
This video will provide you a few details about Huawei's Latest Drivers and provide the download link. I will also guide you on how to install it on your Windows PCs. Huawei is the most popular brand which provides routers and modems around the world. It provides a USB dongle as well as MiFi routers too. We have already covered unlocking these devices, e.g., Huawei UMG587, Huawei E5251, Huawei Vodafone R208, and Huawei E3276, etc. To run any Huawei device, you need some drivers. Without drivers, your modem/router is useless and cannot be used. These devices come with outdated drivers, and in the latest operating system, they may not work. Hence, in this post, we will provide the latest drivers for Huawei, which will work with modems and routers. How to Install Huawei Drivers in Windows Computer? Step 1. Download the Huawei drivers file from the link at the post’s end. Step 2. Extract it on your PC using WinRAR software. Step 3. Double-click on setup.exe. Step 4. It will show nothing on the front and install the drivers in the background (according to Windows 32-bit or 64-bit system). Note: While installing the Huawei drivers, your modem/router should not be connected to a computer. Subscribe to @RouterUnlock YouTube video channel for more tips and tricks. Thanks. #router #modem #unlock #huawei
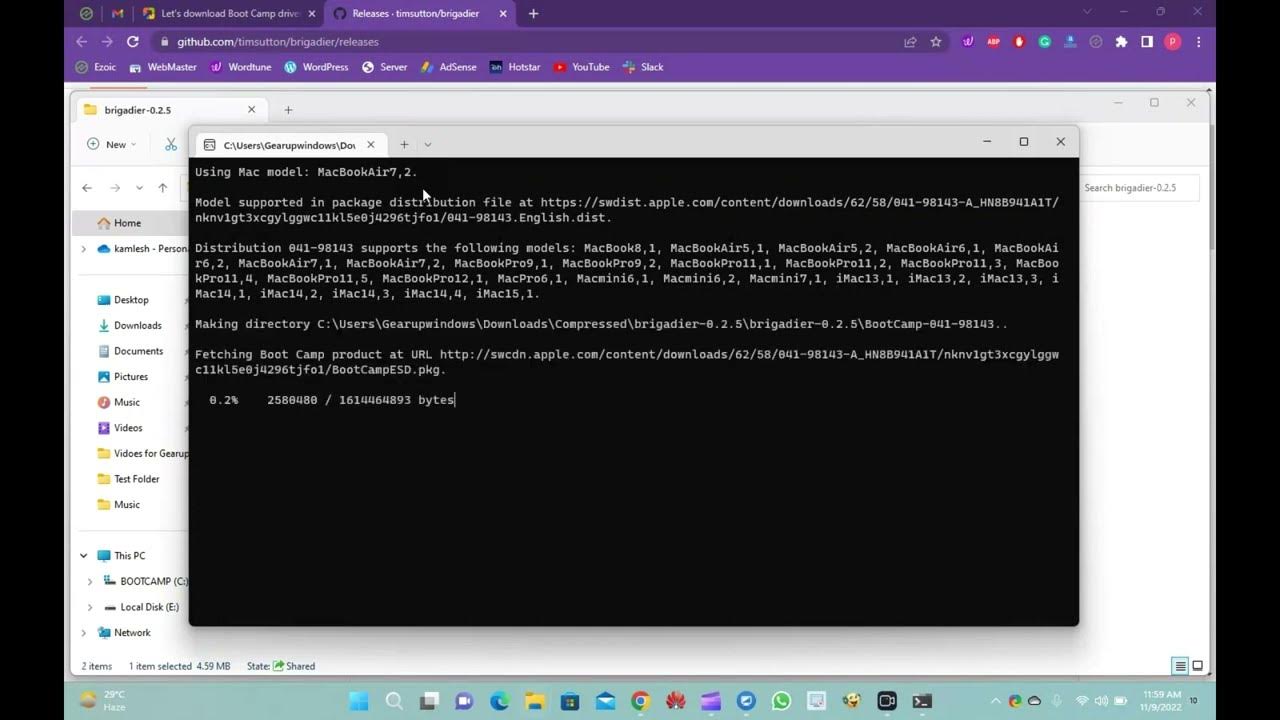
Brigadier Downloads Boot Camp Drivers without Boot Camp Assi...
1K views · Nov 9, 2022 gearupwindows.com
In this video, we will guide you on using Brigadier freeware tool that Downloads Boot Camp Drivers without Boot Camp Assistant. One can download and install Boot Camp Drivers from Apple’s official website, but we could not find the latest version listed on Apple’s official website. In such a case, we need to use a third-party tool to update Boot Camp drivers. Another reason to use a third-party tool is to update the drivers; for instance, you might want to install Boot Camp drivers on a Mac machine where Windows 10 is the only operating system. Downloading Boot Camp Drivers using Brigadier Brigadier is a freeware tool available for download that enables you to download Boot Camp drivers or support software without Boot Camp Assistant. In other words, with the Brigadier tool, one can download all Boot Camp drivers on Windows 11/10 running on a Mac. There is no need to worry if you use the Brigadier tool because it downloads all Apple servers’ drivers. So, ever after using the Brigadier tool, you will get original Boot Camp drivers from Apple. The Boot Camp drivers pack includes device drivers for all the hardware, including the camera, trackpad, wireless trackpad, graphics, keyboard, card reader, wireless mouse, etc. According to the developer of the Brigadier tool, it downloads and unpacks ESD that applies to the Mac model on which you run this tool. It uses 7-Zip software to extract the ESD, and if the 7-Zip is not found on your Windows 10 PC, it will automatically download the same and remove the same after extracting the ESD. To use the Brigadier freeware tool, just visit the official page of Brigadier and download the latest version. Unzip it using WinRAR or any other achiever. Run the Brigadier tool by double-clicking on its executable file. You will see a Command Prompt window that runs and displays information about the Boot Camp support software download, including the download progress. The tool runs in the background and downloads all the necessary Boot Camp drivers on your Windows 10 PC in the same location where the Brigadier executable folder is located. The beauty of the Brigadier tool is that it automatically detects your Mac model and downloads the right Boot Camp drivers for Windows 11/10 running on your Mac, just like the Boot Camp Assistant software. Download Brigadier You can download the latest version of Brigadier from GitHub (https://github.com/timsutton/brigadier/releases). That's it. Please subscribe to @GearUpWindows channel if you have not already done. Thanks. Chapters 00:00 Introduction 00:49 Download Boot Camp Drivers using Brigadier 03:28 Download Brigadier #windows #windows11 #windows10 #free #freeware #bootcamp #apple #drivers #driver
2 Ways to Find Computer Model & Serial Number of Windows...
8K views · Nov 9, 2022 gearupwindows.com
In this video, you will learn to Find the Computer Model & Serial Number of a Windows 11 PC. Please note that required links, codes, commands, etc., are available in the video description. On a Windows 11 machine, knowing the model number of your computer or laptop may be helpful in a few scenarios. For example, you want to upgrade your system component (memory, hard drive, display, and power supply). Using the model number, you can search the internet to obtain a compatible replacement. If your PC is not working and you want to troubleshoot the problem, you need technical support. It is handy to maintain the inventory of the device properly. A lot of computer manufacturers usually affix a sticker to find this information on your laptop or desktop. Apart from that, Windows 11 offers at least two ways to find the model number and serial number (service tag) of your computer or laptop. Using System Information, or Windows PowerShell on Windows 11, you can quickly note down the serial number or service tag. In this gearupwindows article, we will guide you to find out the model number of your device, whether it’s Dell, HP, Lenovo, Acer, or from another make. These methods are the following:- View the PC model number with System Information Find out the PC model number using PowerShell How to View PC model number with System Information? To find or view the computer model number using System Information, use the following steps:- Step 1. Click the Start or Search button and type the following:- System Information Step 2. From the available search results, click on the top entry “System Information” to open the System Information window. Step 3. In the left sidebar of the System Information window, select System Summary. Step 4. On the right side pane, you can find the model number of your computer or laptop beside the “System Model” item. How to Check the PC Model Number and Serial Number using PowerShell? Using PowerShell in Windows 11, you can check the desktop or laptop model number as well as the serial number. Here is how to do it. Step 1. Open Windows PowerShell on your Windows 11 computer. Step 2. In the Windows PowerShell window, type the following and hit Enter key on the keyboard:- Get-CimInstance -ClassName Win32_ComputerSystem Step 3. Among the several options, the output also includes the model number under the “Model” field. Step 4. To view the serial number of your PC using PowerShell, again type the following command and hit Enter key on the keyboard:- Get-CimInstance -ClassName Win32_bios The output includes BIOSversion, manufacturer as well as Serial Number. You can view your computer serial number beside the “SerialNumber” field. That's it. Please subscribe to @GearUpWindows channel if you have not already done. Thanks. Chapters 00:00 Introduction 02:00 How to View PC model number with System Information? 02:55 How to Check the PC Model Number and Serial Number using PowerShell? #howto #powershell #windows #windows11 #tutorial #tutorials
RocketDock Adds Animated Mac-style dock in Windows 11 and 10...
3K views · Nov 9, 2022 gearupwindows.com
In this video, you will learn about a RocketDock. An Animated Mac-style dock for Windows 11 and 10. Have you recently switched from Mac to Windows 11/10 and missed Mac’s Dock? RocketDock is the right tool that lets you feel dock in Windows 11/10, similar to macOS. RocketDock for Windows 10 and 11 Apple lovers developed RocketDock in 2005, and it is still available for Windows operating systems. This dock comes with shortcuts to several commonly-used folders on your system, as well as a fully functioning Recycle Bin. Once you install RocketDock on your PC, you will see This PC, Network, Documents, Music, Pictures, Control Panel, and Recycle Bin are pinned on RocketDock. You can customize the docks by adding your own folder shortcuts or system files. It lets you change the default icon, and even it comes with 30 themes that let you customize the appearance of your dock. To add a new application on the dock, just drag the application shortcut to the dock, and it is added in RocketDock. Similarly, if you want to remove any application or folder from the dock, drag the application icon to the outside of the dock; it is removed or deleted from the dock. However, there is an option to lock all docked items so that accidental deletion will not occur. RocketDock is highly customizable. You can access its settings by clicking on the “Dock Settings” icon from the dock or right-click on free space on the Dock and selecting the “Dock Settings” option. If you want to run dock automatically when you start your Windows, you can select the settings “Run at startup” in the General tab. There is also an option to “Lock Items” on the dock if you don’t accidentally delete any dock items. You can set the quality of icons in RocketDock between low, average, and high. There are options available to change the opacity, hover effect, and icon size in the dock. The best part of RocketDock is its positioning feature. You can set your dock location on your Windows PC almost anywhere on the screen. You can choose the left, right, top or bottom options to align the dock horizontally or vertically. Once you set the position of the Dock, you can arrange the Edge Offset and Centering position. While you can set dock position in almost all areas on the Desktop, you should be more careful when choosing the dock’s position. For instance, if your dock and Taskbar are both at the bottom of your screen, you can accidentally open apps from your Taskbar when trying to click on the dock. However, you can always move this dock to another position or autohide your Taskbar, or you can select autohide to RocketDock. Download RocketDock The RocketDock is free software for Windows PC and comes with a cool user interface. It is compatible with Windows 11/10/8/7, both 32-bit and 64-bit architecture. You can download it from its official website (https://punklabs.com/). Please subscribe to @GearUpWindows channel if you have not already done. Thanks. Chapters 00:00 Intro 00:38 RocketDock for Windows 10/11 04:00 Download RocketDock #windows #windows11 #windows10 #windows7 #free #freeware
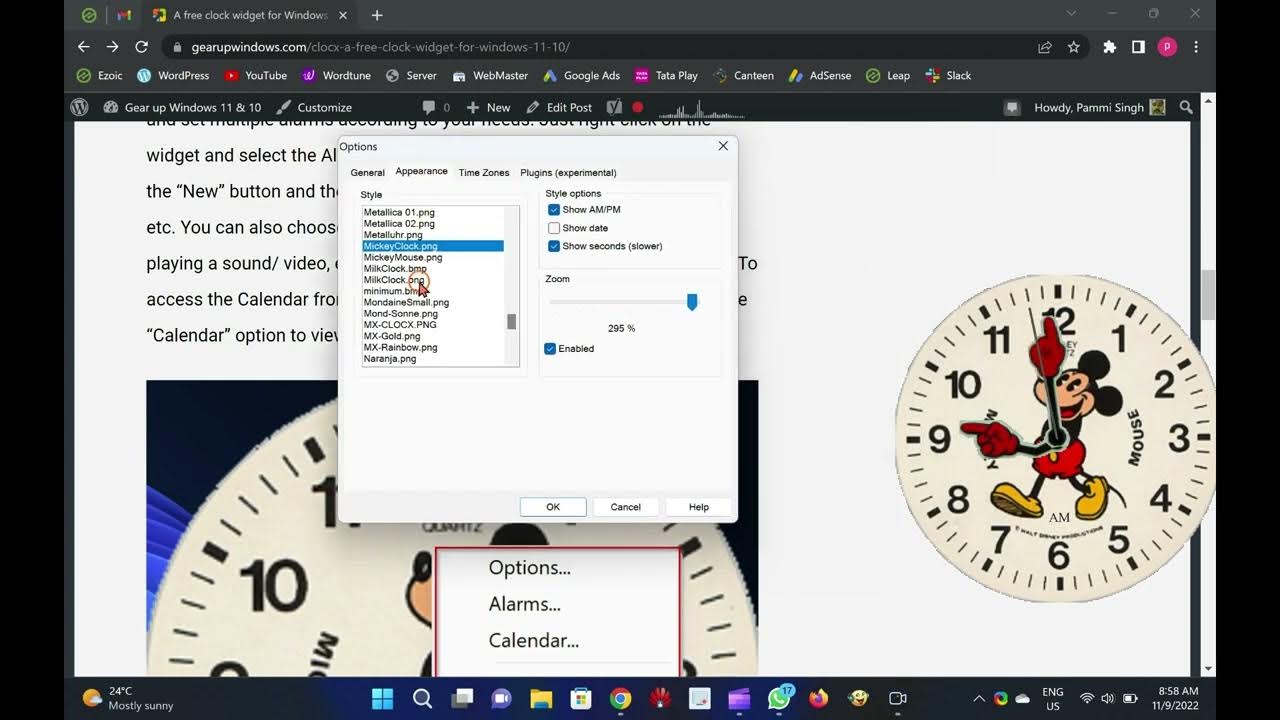
ClocX Adds a Free Clock Widget on your Windows 11 and 10 PCs
2K views · Nov 9, 2022 gearupwindows.com
In this video, we will introduce you to a famous clock widget ClocX. It is free and works well with Windows 11 and 10. If you seek a beautiful clock widget for the Windows 11/10 operating system, then ClocX may be the right choice. ClocX is a free clock widget software for Windows 11 / 10 / 8 / 7 / Vista / XP. It enables you to use an analog clock widget on the top of your desktop. By right-clicking on this clock on the desktop, you can access some handy options, including always on the top, unmovable, calendar, etc. ClocX for Windows 11 and 10 The ClocX comes with several inbuilt themes. You can choose and apply any theme by right-clicking on the widget and selecting the Options Appearance tab. Apart from that, this clock widget also allows you to add and set multiple alarms according to your needs. Just right-click on the widget and select the Alarms option. In the “Alarm” dialog window, click on the “New” button and then set the alarm with its name, reoccurrence, time, etc. You can also choose actions when the alarm hits the time, such as playing a sound/ video, executing an application, or shutting down the PC. To access the Calendar from this widget, right-click on the clock and select the “Calendar” option to view it. Apart from that, you can also customize many widget options like transparency, mouse-over transparency, style, language, time zones, priority, allow multiple instances, and more. The best part of this ClocX widget is that it allows you to run multiple instances. That means you can hang several clocks as a widget on the desktop. All are independent of each other, which means you can use a different theme for all the clocks to beautify your desktop. Download ClocX You can download the freeware version of ClocX from its official website (http://www.clocx.net/download.php). Please subscribe to @GearUpWindows channel if you have not already done. Thanks. Chapters 00:00 Intro 00:56 ClocX for Windows 11/10 02:39 Download ClocX #windows #windows11 #windows10 #free #freeware #widget

How to Enable or Disable Registry Editor on Windows 11?
3K views · Feb 6, 2023 gearupwindows.com
How to Enable or Disable Registry Editor on Windows 11? Registry path:- HKEY_CURRENT_USER\SOFTWARE\Microsoft\Windows\CurrentVersion\Policies Group policy path:- User Configuration Administrative Templates System Install gpedit.msc on Windows 11 Home:- https://www.youtube.com/watch?v=d92wyHSrVDM Read more at https://gearupwindows.com/how-to-enable-or-disable-access-to-registry-editor-on-windows-11-or-10/ My channel: @gearupwindows #gearupwindows #windows #windows11 #registry #regedit